Final Chapter on the Tavern Table

Wow, I see that almost a month has passed since my last post on the tavern table. Hard to believe it’s been that long, but I’ve finally completed the finish after pecking away at it on evenings and weekends. I honestly think it may be the last time I use milk paint for a long while. I love the results, but it is ridiculously labor-intensive. Look for some experimentation with alternatives – oil paints and tinted shellac – in future blog posts.

When I left off, I had just burnished the second coat of ‘Goldenrod’ and applied a layer of orange shellac.
IMG_20160209_221831480

It’s a bit gaudy to modern eyes at this point, though I believe a color similar to this was pretty popular for Windsor chairs in the late 1700s (those folks liked brighter colors than we tolerate today).

The next step was to cover the Goldenrod with a couple coats of ‘Peacock’.

Tavern 001

Originally, my plan was to paint the top the same color as the base, but once I got the Peacock on the base, I realized that the table actually looked really good with a contrasting top. I decided that a layer of red paint, judiciously rubbed through to the yellow below, might look even better.

Rather than marching forward with more milk paint, I decided to experiment with some oil paint instead:

IMG_20160213_083149700
Making oil paint does not require fancy materials. I used some boiled linseed oil, red iron oxide pigment, and turpentine. (Long-time readers might know that I’ve complained about boiled linseed oil before due to its metallic dryers, but its rapid drying time was too tempting in this case for a project that has already dragged on for far too long.)
IMG_20160213_083614630
I don’t have a fancy glass muddler, but a glass bowl and a teaspoon seems to work fine. I used 1/4 tsp. pigment, 1 tsp. oil, and 1/2 tsp. turpentine. I made that up on the spot, so don’t make the mistake of assuming that there is any magic behind those proportions. It did make a fine paint of good consistency.
IMG_20160213_084206511
I gave the top a washcoat of Peacock, which dried overnight before I used the oil paint. The effect of layering different colors gives a natural irregularity to the color, which I enjoy.
IMG_20160213_084605511
And here is the tabletop with two coats of the red paint. Quite nice, I think. I like this much more than a solid-color table.

The final step was to rub down the whole table with Scotch-Brite pads. I tried to simulate age by rubbing through the top coat in predictable locations: around the drawer knob, on the corners and edge of the top and legs, and especially on the tops of the stretchers where feet should rest. I stopped short of “distressing” the piece with dents, scratches, rasping, and sanding. I don’t have the willpower to spend the time on a good and realistic distressed finish, and a poorly distressed piece (AKA “shabby chic”) is, shall we say, not to my taste.

Tavern 004

Finally, after an hour of burnishing, the table was ready for its final coat: a layer of home-brewed wiping varnish (1/3 boiled linseed oil, 1/3 satin oil varnish, 1/3 turpentine).

The final coat highlighted my second major annoyance with milk paint (the first being labor): It changes color dramatically when the oil is applied. I quite liked the blue-green appearance of the unfinished milk paint. But the second you apply the varnish (or oil, or shellac, or any other protective finish), the color darkens more than you might expect.

Tavern 001
Before Varnish
Tavern 005
After Varnish

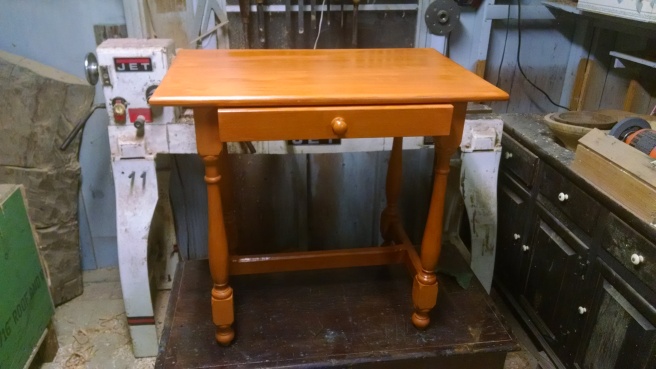
Now, don’t get me wrong: I’m quite happy with the final appearance of the table. I’m just annoyed that I couldn’t predict how it would look until after the varnish was applied. If I had a specific color that I was trying to match, I would have been far more annoyed. The nice thing about oil paints and tinted shellac is that the color looks pretty much the same when it’s mixed, when it’s going on, and when it dries. Milk paint, on the other hand, has one shade when you mix it, a different shade completely when it dries, and yet another completely different shade when you finish it. Unless you are deeply familiar with the product, it’s just unpredictable.

Anyway, enough of my ranting. How about some glamour shots of the finished table?

This slideshow requires JavaScript.

Getting Shellacked at the Tavern Table

The finish on the tavern table is well underway. I put on two coats of “Goldenrod” milk paint from The Real Milk Paint Co. on consecutive evenings, burnishing with Scotch-Brite between each coat. Let’s be clear: I hate burnishing milk paint. It’s not so bad on a flat surface, like this tabletop, but it is dusty, messy, smelly, finger-numbing work on the turnings with all their curves and crevices. But, if you wish to use milk paint, it is a necessary evil (a necessary evil that almost makes me want to try oil paints).

IMG_20160209_212322989_HDR

The color goes on rather bold:

shrink pot 004

But after two coats, I apply a layer of orange shellac which calms things down considerably.

IMG_20160209_220720936_HDR

I once asked Chris Schwarz if he used pre-mixed shellac or mixed his own. His response: “Buying pre-mixed shellac is like buying frozen lasagna”. Perhaps, but the frozen lasagna has one thing going for it that homemade does not: it may be mediocre, but at least it’s consistently and predictably mediocre. Homemade lasagna can be world-class, but I have had some crappy homemade lasagna as well.

This is relevant, because I have had mixed success mixing my own shellac. Last time I bought a pound of flakes, they didn’t dissolve in the alcohol any more than if I’d thrown a handful of Wheaties into the jar. And the dregs that did dissolve refused to dry, but instead preferred to live out their brief existence as a gummy film on top of my painstakingly wrought furniture. The shellac was from a reputable dealer, but I was too inexperienced at the time to know that it was a bad batch, so I just ate the cost and moved on.

All this to say: I buy Zinsser from Home Depot, and I don’t feel a bit of guilt. It’s always 10 minutes away, and at least I know what I’m getting when I buy it. I have no complaints about how it’s held up on my furniture, and my earliest shellac-finished piece will turn 10 years old this year.

So, after hours of painting and burnishing and shellacking, here’s where things stand. Next up will be a couple coats of blue-green “Peacock”, unless I decide that this straw color is more to my liking. I’ll have a better idea when the shellac is fully dry and rubbed down.

IMG_20160209_221831480


The Tavern Table is Built. Now I Need a Tavern.

The tavern table was a fun build, and quick, too. Relatively speaking. I compare everything now to the Windsor chair build that stretched on for three months. It’s amazing how simple everything becomes when all of the angles are at 90°. And how convoluted things become curves and angles that aren’t right come into play. I started the table on a Friday evening, and it was fully assembled by that Sunday afternoon.

I have a few pictures, but must apologize for the quality. The lighting in my house is atrocious, and outdoors isn’t any better. Our yard is a scrubby wasteland of sand and weeds a few blocks from the beach.

staked 081

I was surprised how much visual interest this simple molding on the bottom of the aprons adds to the table. I’ve never used a detail like this before, but I’ve noticed that some sort of molding is present on the aprons of nearly every joint stool and tavern table that I’ve seen. Definitely worth the small effort to get this effect.

staked 076

The legs were a blast to turn. The shape is very, close to the original, but I didn’t hold myself too closely to the details. I felt that they could use improvement, so I improved them. I’m very happy with the way these turned out. Plus, it was extra practice for my next Windsor chair! I’m still having trouble with the skew chisel on those beads – I find that to be the hardest part of baluster turnings.

taverntable 049

Another tweak to the original design: I reduced the number of lower stretchers from four to three, and moved the long stretcher to the center. I did this so that the table can be used as a children’s dining table when we have a lot of company. My son is in a wheelchair and needs to be able to roll up close to the table; outer stretchers would prevent that.

I also used chamfers and lambs’ tongues instead of the simple roundover on the original. No reason, other than I like the way they look.

staked 074

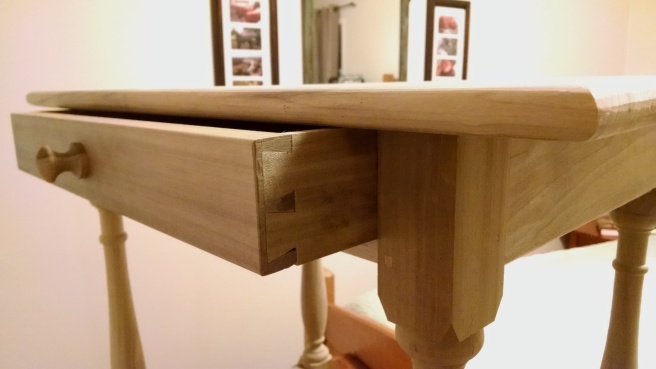
I do love drawer-building. Especially small ones like this. It becomes harder to make a smooth-running drawer as the size increases. This drawer fits nicely with maybe 1/32″ gap on the sides and 1/16″ on the top. It slides sweetly.

staked 073

And of course dovetails are ever fun to cut.

staked 079

I even found time to add a bit of bling to the drawer bottom. I have wanted to try some Peter Follansbee-style carving for years, and I finally made it happen. I didn’t want my first carving to be front-and-center on a piece of furniture, so a drawer bottom seemed appropriate. The carving is a bit of an anachronism – 17th-century English carving in an 18th century Charleston table – but it doesn’t bother me. Avert thine eyes if thou art a pedant.

staked 083

taverntable 102

The table still needs a finish. It will be painted, like the original. Unlike the original, I will not be using oil paint with toxic heavy metal-laden pigments. Milk paint will suffice. I’m thinking blue over yellow, with shellac topcoat.


Rigorous Mortise? Nah, it’s easy…

I mentioned earlier this week that the pegged mortise and tenon is my favorite woodworking joint to make. One of the things that makes it my favorite is a feeling of competency and efficiency, and those are feelings that only come with practice. It makes a big difference when you begin a process with the expectation, rather than the hope, that everything will come together right.

I’ve been cutting mortises by hand since 2007, but it wasn’t until I built a commissioned Arts-and-Crafts office desk in 2013 that I truly felt comfortable with the process. That piece had over 100 individual mortise and tenon joints, more than half of them were through-mortises. Lots of practice, and plenty of time to refine my technique.

There are certainly no shortage of methods to try.

Christian Becksvoort pre-drills the mortises with a doweling jig and cleans it up with a sash mortise chisel. I’ve not found that pre-drilling the holes saves any time – unless you have really wonky grain, in which case the chisel will tend to want to follow the grain if you don’t pre-drill. Best to use straight-grained stock instead.

Chris Schwarz no longer uses this method, but he once wrote about a method of drilling a hole in one end of the mortise and then chiseling back from that hole until you reach the opposite end (the “Maynard technique”).

Peter Follansbee uses a traditional mortise chisel and starts by cutting a vee in the middle of the mortise, then working his way back to the ends. I really want to like this method, and I’ve tried it several times, but I find that my accuracy is compromised by switching the bevel back and forth like he does. I like to get my chisel in the right position and keep it there.

Which is why my preferred method is something along the lines of what Paul Sellers does. Actually, “along the lines” is dead wrong; I chop my mortises exactly like Paul Sellers does. Oddly enough, I had never even seen him chop a mortise under I was gathering links about different methods for this very post. Our only difference of opinions: he prefers a standard bevel-edge, chisel, while I prefer the traditional mortise chisel.

So, on that note, a change of plans. I had taken a bunch of pictures that were intended to demonstrate the method I use, but instead I’ll just post Paul’s video instead. If a picture’s worth 1000 words, a video must be worth 10,000.


Okay, I can’t resist a bit of commentary on Paul Seller’s methods. In all of his videos where he’s mortising something, he’s holding the piece in his face vise. That sure seems like a good way to add unnecessary stress to your vise and the screws that are holding it in place. I mortise with my workpiece clamped to the benchtop, directly over a leg, using a holdfast or a big handscrew. Like so:

taverntable 020

Also, I mark out only three sides of the mortise: the top, the bottom, and the edge that is closest to the face. The chisel itself defines the fourth side, so I don’t find it helpful to mark out the far edge. The only thing to watch out for with this method? Don’t chop your mortise on the wrong side of the line! Sometimes, when the mortise is close to the face (like in this example), it’s obvious which side to chop on. Other times, when the mortise is more centrally located, it’s not quite as clear. I have chopped on the wrong side of the line before, so I tend to draw a little squiggle on the side where I need to chop. (I don’t usually darken the scribe lines with a pencil, though- that was just for the picture.)

taverntable 022

My tavern table had 10 regular mortises and four double mortises. The last four that I chopped measured 2″ long and 1-3/4″ deep. Out of curiosity, I timed myself and found that I chopped them in 4-5 minutes each. It’s quick and painless once you’re familiar with the process, and there’s nothing quite like sliding a joint together for the first time and having it look like this:

taverntable 042

I’ve Got You Pegged.

The pegged mortise-and-tenon: my favorite joint in woodworking. And not just any pegged mortise-and-tenon. When reasonable, I prefer to drawbore my joints as well. If you aren’t familiar with drawboring, then best to head straight to the expert himself: Peter Follansbee. This post is just as excellent today as it was when he wrote it seven years ago. And drawboring is just as effective today as it was 400 years ago.

What I’d like to talk about today, though, is a very specific part of the joint: the pegs (or pins). For a while, drawboring gave me fits every time I tried it. It seemed like 1 in 4 joints was a failure – either the peg would fail to snake its way through the offset and end up breaking, or the face of the mortised piece would crack as the peg was getting seated.

I couldn’t figure out was I was doing wrong. Too much offset in my holes? Were the pins too big? As it turned out, the problem was indeed my pins, but not so much the size as the shape.

Here’s a picture of the very first piece where I used pegged mortise-and-tenons. It’s a Shaker-style cherry table that I made in 2007, I think. Not drawbored – the joint was glued up, clamped together, then I bored through the joints and drove the pegs. For this piece, I simply grabbed some offcuts of cherry and turned them to dowels 1/4″ in diameter. Worked fine for this piece – there was no offset to snake through, so the pins went home without any fuss. But unbeknownst to me, this technique was the beginning of all of my drawboring woes.

Pegs 020

Pegs 019Fast-forward to 2011. I was building a queen-size Arts-and-Crafts bed for my wife. The rails were 5′ long – a foot longer than my clamps. It was the perfect opportunity to try a bit of drawboring, since the pegs will pull the joints tight, rather than relying on clamps. I resorted to the method that I had used many times before for pegged joints. I grabbed some offcuts of white oak, split them to get straight-grained pieces, and turned them to size on my lathe. I even gave the ends a really good taper to help the pegs find their way through the offset.
What a nightmare. I think I busted two of the pegs completely as I was trying to drive them home. There was nothing I could do but watch helplessly that the oak shattered underneath my hammer. Luckily, the joints were pretty tight already, and made to tolerances that allowed the glue to hold the joints together without relying upon the pegs, but it was still painful to watch after hours of careful preparation.

You can still see just a bit of damage to the peg in the photo above that did’t quite disappear when I pared it flush. Luckily, this is all the evidence that remains of that failure.

I tried a few more methods after that. I shaved some straight, octagonal pegs, rather than round ones. No dice. I tried reducing the offset of my drawbores to a mere 1/16″. That works, but the joints don’t always pull as tightly as you would like. Finally, I stumbled upon Peter Follansbee’s work and the scales fell from my eyes. As it turns out, the root of my problems was the taper of my pegs.

I had been working with what were essentially straight pegs, with just a small taper at the tip – basically sharpened like a pencil. The problem with this shape is that the peg doesn’t get a chance to snake its way all the way through the tenon before the peg hole fills up and meets strong resistance. It occasionally ends up being too much resistance to overcome, and the pegs shatter before they can be driven down tight.

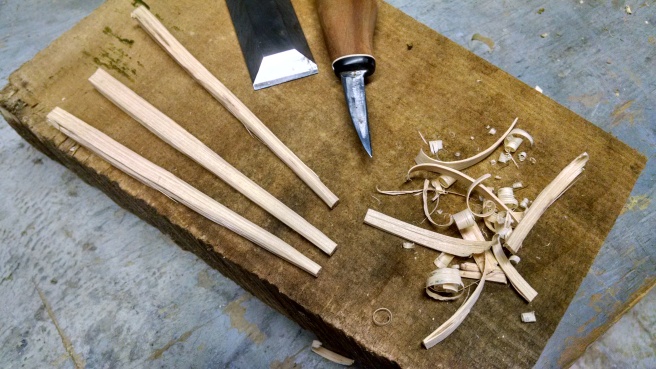
The solution? Instead of a short, blunt taper at the tip, now I use a taper that continues the entire length of the pegs. Like these:

taverntable 078

For a 5/16″ peg hole, these pegs start off at maybe 3/16″ at the tip and taper gently to a bit over 5/16″ at the butt. They’re more or less octagonal in cross-section, gradually changing to a square at the butt, but I’ve found that the cross-section matters less than getting the taper right. They can’t be too big a the tip or you’re asking for a failure.

I should mention, too, that riven wood is absolutely critical. Don’t try to do this with a store-bought dowel. Keep some dry offcuts of oak, hickory, ash, or sugar maple. Split out what you need. I like a peg about 5″ long – enough to handle easily while I’m shaving them. I use a sharp chisel to get a square taper, and then cut the corners off with a knife. You can do the whole thing with a chisel if you want.

taverntable 063

Get it started with the pinhole over a doghole, or hanging off the edge of your bench. These pegs need to go all the way through.

taverntable 064

Stop driving when you meet strong resistance. You can feel and hear the difference when these pegs are fully seated.

taverntable 068

Then cut the pegs close to the surface with a backsaw – careful not to mar the surface – and pare them flush with a wide chisel.

taverntable 070.jpg

There were 20 drawbored mortise-and-tenons in this table frame – and not a single failure. My success rate has improved tremendously since I started making proper pegs.


Flattening a Cupped Board

I love wide boards. My most cherished timbers are some 18″-wide cherry boards from a huge, standing dead cherry tree that I found back when I lived in South Mississippi. They have some beetle holes from the decade or more that the tree stood forlornly in the forest after it died. But they’re wide. Also, some 17″-wide white pine boards from a tree that died in front of my house when I lived in North Georgia. It was a yard tree, full of knots and pitch, but those boards…so wide. And of course, a stack of 18″ to 24″-wide poplar planks from a discarded butt from a logging job in Mississippi. The loggers left the butt because it splintered as it fell, but there was still plenty of good wood for me to salvage. And it was worth it, because, well, wide. Reeaaally wide…You know?

It traumatizes me greatly to have to glue up boards to make a wider panel. Sometimes it’s unavoidable, like when I made my 48″-wide sassafras table. Alas, there were no 48″-wide sassafras boards to be had. At least not in my wood stash. But usually I just end up designing my work to suit the stock that I have on hand.

Such was the case when I began work on a small tavern table over the weekend. I began with the intention of reproducing a small table from the MESDA collection. I’ve had my eye on that piece for years, ever since Chris Schwarz built a version for Popular woodworking a few years back. The original is from Charleston, South Carolina around the 1720’s. Not bad-looking for a 300-year-old.

5440703898_88c4f51881_b
Photo credit: popularwoodworking.com

Actually, to say that I’m building a reproduction would probably ruffle the feathers of an ardent antiquarian. The original was made of cypress. I don’t have any cypress. The original utilizes some unconventional drawer construction. I don’t mind the unconventional, but I don’t hesitate to build things a bit differently if it suits my fancy. The original turnings exhibit quite a bit of variance from one leg to another. This was presumably not the intention of the maker, so I definitely will not be trying to replicate that variance. Mine will be different, too, but in their own unique way. And the original has a 21″-wide top. I have some poplar that wide, but it’s 8/4 stock that is destined for Windsor chair seats. My widest 4/4 poplar is 19″. Therefore, my table will be 19″ wide.

See how easy that was? No need to glue a 2″ strip to the edge of a gorgeously wide plank. I suspect the original table would have been 19″ wide also, if the maker’s widest cypress board had been 19″ wide.

There is only one problem with my 19″ wide poplar boards. They are cupped. Pretty badly. If I tried to plane this sucker flat, I’d be left with a 1/4″-thick top. That ain’t good.

taverntable 072

So what’s the solution? Well obviously, I just need to cut the sucker apart. Flatten out three narrow boards individually. That’s obviously the right decision, because then I can feed the boards through my 12″ planer! Then I can glue them back together, and no one will be the wiser!

Screw that. All of it. The day you see me cutting apart my wide boards so that I can straighten out a minor cup/fit them through my planer/orient the growth rings differently/or any other stupid reason is the day that you will know the I’ve gone to the Dark Side, Anakin Skywalker-style.

A wide, mildly cupped board can easily be flattened with a little TLC. Here’s how I do it:

1) Wet down the concave side with a healthy amount of water. Make sure to really let it soak in. Sometimes I even leave a wet cloth on top of the board for good measure. I prop it up on some stickers to get good airflow to the convex side.

taverntable 074

2) Come back a few hours later. Hopefully, the board has straightened out a bit. In this case, the board was perfectly flat after leaving it overnight. If not, add more water and wait longer.

taverntable 075

3) Now the board is flat (or maybe even cupped a little to the opposite side). You want it to stay flat. So, clamp it tight to a couple of cauls. Leave it in the clamps for a couple of days. Better yet, until you’re ready to use it. More than likely, the board will stay flat when it is completely dry.

taverntable 076

Now you’re ready to sharpen your hand planes and get to work.

This technique does have its limitations. The narrower or thicker your board is (basically, the closer it is in cross-section to a square rather than a long rectangle), the less likely you are to have success with this method. I’ve had great luck with stock 12″ and wider, and a little over an inch thick. I wouldn’t expect this to work with 8/4 stock (but maybe with more time and water? I dunno, I don’t do tabletops with 8/4 stock. I use it mostly for legs so the boards can be as cupped as they want to be).

Good luck, and go give those wide boards the respect they deserve.