“The caterpillar does all the work, but the butterfly gets all the publicity.”
-George Carlin
I felt like a caterpillar last week. My latest project involves an oak crotch so riddled with cracks and shake that would have been better suited to the firewood pile were it not for the alluring flame figure of the grain. Just making the slab usable involved inlaying a dozen butterfly patches to stabilize the defects. Few people will look at the end result and understand the work involved, but it was enjoyable work nonetheless.
I’ve always found butterflies to be a bit tricky to make by hand. They are small and annoyingly difficult to clamp. The solution is to keep them attached to a larger block for as long as possible.
1) Mark out your cuts on a piece of wood that is quite a bit longer and wider than the butterflies that you intend to make.2) Cut a few kerfs down to the “waist” of the butterflies. You can also cut between the butterflies, or you can wait until after the next step.
‘v
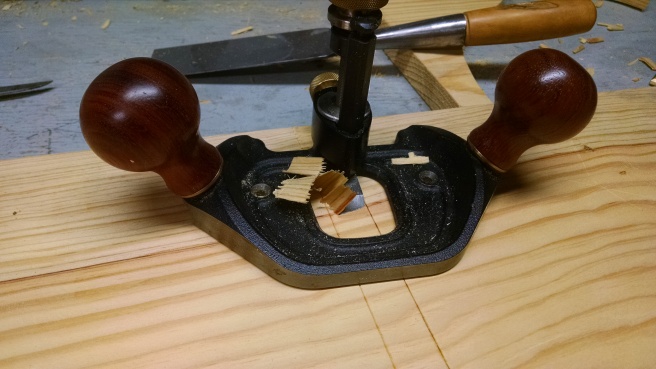
3) Using a chisel that is wider than your board, chop out the bulk of the waste, then carefully pare down to the lines, being especially careful to keep the sides of the butterfly perpendicular to its faces. Side note: Trying to cut these things using just a backsaw is a fool’s errand. You can do far more accurate work with a chisel, and it really doesn’t take any longer. Trust me, I’ve tried it both ways, and this is the way to go.4) Now you can free the butterflies from the blank. On the opposite side, cut another kerf to the waist and remove the waste with the chisel.5) Now your butterflies are ready to inlay. I made a variety of sizes to avoid a monotonous look. I can match the size of the butterfly to the size of the crack.6) To inlay the butterfly, begin by locating it on the crack and carefully striking a line around it. Deepen the line with a chisel, tapping lightly with the mallet. The outlining is the most critical part of the inlaying process, so keep your focus and do it right.7) At this stage, methods will differ. Some people like to use a router to remove the bulk of the waste. I would rather sell my first-born to cannibals than use the screaming-devil-spinny-tool when it isn’t absolutely necessary, so I opt for a cordless drill and a Forstner bit instead. I shoot for a depth somewhere between 3/8″ and 1/2″. It isn’t critical, as long as it’s consistent.8) The remaining waste is evacuated with a few chisels. Very handy to have a bevel-edge chisel with a bevel that actually goes all the way to the edge for this task. It’s nice to get the floor as consistent as possible, but more of your focus should be on getting the walls vertical and cutting right-up-to-but-not-over the scribe lines.9) Don’t spare the glue when you put these things in. Tap it in with a hammer, saw it flush, and level it off with a hand plane. Ahhh, that’s a nice fit. Ten more to go…
I’ve said it before, but I’ll say it again: Steam-bending is one of the most satisfying processes in all of woodworking. There is something uniquely rewarding about taking a green log, splitting and shaving it to reveal a stiff, straight stave, then magically transforming it into a bendy, pliable thing that conforms to a sinuous shape upon your command – all within the span of a few hours. Amazing. (I wrote about my dirt-cheap steam-bending rig here, by the way.)
The stock that I chose for this chair’s continuous arm rail was apparently very good, because I didn’t experience so much as a single lifted fiber. After a week of air-drying and a couple of days in the kiln, the arm rail was set and I was ready to finish off the spindles.
Shaving spindles is meditative work for me. I quite enjoy the predictable nature of the way the riven oak works with the spokeshave. No reversing grain, no hidden knots. Just shave the bottom and the top tenons round and to the proper dimensions, then shape a symmetrical, gently arcing swell in the middle. Shave, test fit, shave some more, re-test, until you finally get a nice, tight fit into the mortises. It’s quite easy to overdo it and get the tenons just a hair too thin, so concentration is required. Fortunately, I had two trusty shop helpers who were making sure that I maintained focus at all times.
I may have shaved a couple of spindles too thin, but I still can’t figure out why…
Soon enough, I had 13 spindles plus the two turned arm stumps fitted nicely into the seat.Once that was accomplished, it was followed by a painstaking process of measuring and drilling the arm rail, then sawing and shaving the spindles some more so that they all fit properly into the arm rail.
Spindles dry-fitted to the seat.
Spindles wedged into the continuous-arm.
Many hours later, it was finally time for glue-up. This was my first continuous-arm, but I had done enough dry-fitting to predict that it would not be a pretty process. My prediction was, predictably, correct. There were 15 holes in the arm rail, with 15 corresponding spindles that all had to be seated simultaneously, and in the proper position. Then all 15 spindles needed to be split and wedged to clench them irreversibly tight. Everything came together as planned, but I was not masochistic enough to attempt to video-tape that process.
At some point that night, a bleary-eyed wife wandered into my shop and rather gruffly informed me that it was 3 AM. I had just finished shaving the spindle tips flush at this moment, so I proudly stepped aside to display my meticulously wrought creation. “It’s pretty,” she said flatly, “but it’s still 3 AM.”
Then I remembered that I had forgotten to consult my handy graph for the appropriate hours during which to present my work to my wife:
Oh well. I snapped one last picture and turned in for the night.
My wife and I have this conversation nearly every time I finish a furniture piece. I ask if there’s anything she wants me to build before I start my next project. Secretly, I’m always hoping that there’s nothing in particular that she wants so that I can pursue whatever suits my fancy. But there’s pretty much always something in particular that she wants. My obligation, so as not to seem neglectful, is to first build this particular thing prior to moving on to other projects that are tugging at my spirit. It is a rare and fortuitous event, indeed, when what I am asked to build is precisely what I would like to build, but such is the case with my latest project.
A high chair. A Windsor high chair, to be exact. A continuous-arm Windsor high chair, to be pedantic. (Those last two specifications are of my own preference. I was only asked to build a high chair.)
You can buy Windsor chair plans for lots of different types of chairs: fan-backs, comb-backs, loop-backs, balloon-backs, sack-backs, and continuous-arms. With or without rockers. But where do you get a plan for a high chair? Heck if I know.
Although I reject published plans for the majority of my furniture, I am not quite at the point where I would feel comfortable designing a Windsor chair. They are complicated little sons-of-guns. I implored chairmaker Elia Bizzarri for help. His suggestion?
“You can take Curtis Buchanan’s Continuous Arm or Comb Back plans and reduce the seat and back to 2/3 scale. The legs are 22″ long and the diameters are the same as the full size chair. Rear leg angles (into the seat) are 22 degrees and the sight line runs through a point on the CL 3.5″ from the front of the seat. Front legs are at 15 degrees, sighted at a point on the CL 5″ back from the front of the seat.”
That may sound like gibberish to someone unfamiliar with the language of Windsor chairs, but it was all I needed. The good news is that I already had Curtis Buchanan’s continuous-arm plans as a Christmas present from my in-laws. Scaling them down was as simple as setting up the copier at work to 67%, and off I went.
Since I had no wood at the moment that would be suitable for the arm rail, it made sense to start with the undercarriage. First up was the legs. At 22″ long, these required a bit of scaling, as a normal chair leg is 18″ long. I found that the best appearance was gained by extending the balusters (the vase-shaped part in the middle) and the foot, and leaving the rest of the details (coves, beads, and birds-beaks) unchanged.
With those done, I turned my sights to the seat. The full-size seat is 18.5″ wide, but at 2/3 scale, I only needed a board a little over 12″ wide. Easy enough to find. I left the thickness at 2″, since I reasoned that the additional thickness will give greater purchase for the leg-to-seat joinery.
The carving process is identical to the last Windsor chair: First, flatten and thickness the board, then lay out and drill all of the holes for the legs and spindles, then carve and shape the seat.
Flatten and thickness with a hand plane.
Mark out the holes and drill them with the aid of a mirror and bevel gauge.
Carve the gutter.
Get the hollow started with an adze.
Finish it off with the inshave, travisher, drawknife, and spokeshave.
Shape the underside with a drawknife and whatever else fits the bill.
I labored on my first Windsor chair seat for a few days, trying to understand the shape and making sure everything was just right. This one was done in a matter of hours. It’s amazing how much more quickly the work can proceed once you have the end goal firmly planted in your mind. I was not as timid to waste away the unnecessary material, because it was now immediately obvious to me which material was unnecessary.
Finally, I reamed the leg holes and made a few wedges, and the undercarriage was ready for assembly.
Wedges for the legs. Split a chunk of hard maple and shave them with a wide chisel.
Saw the legs flush where they poke through the seat.
The assembled legs and seat.
With that done, it was time to start on the spindles and the arm rail. Since no suitable wood grows on my little island on the Florida coast, that will require a road trip. Luckily, my dad lives in Colbert, Georgia, in the midst of the oak-hickory region. Even more luckily, he owns a small sawmilling operation, and white oak just happens to be his specialty…
Rabbets, dadoes, and grooves are the foundation of boarded furniture. You may ask what “boarded” furniture is, and if you do, then I would direct you to the same source from whence I learned the term: Adam Cherubini’s February 2012 article from Popular Woodworking. In that article, he states:
‘Boarded’ is an archaic English term that was used to describe a form of woodwork characterized by the use of fasteners [nails] as the principle means of attachment. The iconic 6-board chest is probably the most familiar boarded furniture form.
Builders of boarded items also had to deal with the challenge of joining boards at right angles. Many of us believe the best way to join boards is either with dovetails or mortise-and-tenons. Builders of boarded furniture typically did neither.
The idea of nailing boards together, rather than lovingly crafting each joint with dovetails and tenons to micrometer-approved specifications, might rub some the wrong way, but I have eagerly embraced this method over the past few years as an expeditious way to create attractive and robust furniture.
Boarded furniture is not without joinery, but the joints tend to have the function of merely aligning the boards for assembly with nails and/or glue, ensuring that each joint goes together squarely and without difficulty, rather than securing the structure together. You could assemble a pegged or wedged mortise and tenon without glue, if you wished, and it would still be almost as strong as the same joint assembled with glue. If you assemble a piece joined with rabbets and dados and omit the nails, your assembly will be fortunate to withstand a spirited sneeze.
To make sure we’re all on the same page before I go any further, let’s also discuss the differences between three similar joints: grooves, rabbets, and dadoes.
Actually, discussion takes too much time. Let’s look at a picture that I drew instead:
Groove: a three-walled trench that runs parallel to the grain; Rabbet: a two-walled recess that can run either parallel or perpendicular to the grain; Dado: a three-walled trench that runs perpendicular to the grain.
Grooves and rabbets are pretty easy to cut if you are a hand tool woodworker. To cut a groove, you use a plow plane. The fence is registered against the side of the board and cuts a groove a specified distance from the edge. The rabbet is equally easy to cut. Use a rabbet plane, preferably one with a fence. The fence can be fixed or adjustable. Rabbet planes with fences are often called fillister planes. If the fence is adjustable, it would be called a moving fillister plane. Again, the fence registers against the edge of the board and cuts the rabbet a pre-determined distance from the edge.
Now we get to the dado. The dado, you’ll notice, falls in the middle of the board, unlike grooves and rabbets, which are near the edges or the ends. This precludes the use of a fenced plane for making this joint. As a result, there is not one simple tool or method to making a dado by hand. Now, there is such thing as a dado plane. It’s just a simple rabbet plane with nickers on both sides to prevent tearout during the cross-grain cut. However, it’s not a stand-alone tool; it must be paired with a batten clamped across the board to guide the plane.
I’ve never used a dado plane, but I don’t particularly like the idea of a dado plane. First of all, how many would I need? A 3/4″ plane would handle the bulk of my work, but what if I wanted to cut a 1/2″ dado? Or a 1/4″ dado? Do I really want to buy and maintain another tool for every single width of dado I might possibly want to make? No thanks. I also don’t really like working using clamped battens as a guide. This is just a personal quirk, but they always seem to be in the way, and just a small bump out of alignment can result in some very bad words if it isn’t noticed in time.
Fortunately, there is a fairly simple and efficient way of cutting dadoes by hand, without any fancy specialty tools, which brings me (finally) to the point of this article: How I Cut a Dado by Hand.
Dadoes are typically cut in pairs; most often, their purpose is to hold a horizontal board (such as a shelf) to two vertical members (the sides). Therefore, to get the most accurate assembly, it make sense to lay the boards side-by-side to mark both sides at once. I use a framing square and a sharp striking knife to lay out the walls of the dado.
(Ignore fact that I don’t have the sides paired together in this photo; I did, indeed, mark them as a pair).
With the dado defined, I follow the knife with a wide chisel, driving it with a few solid taps into the knife line. I do this along the entire knife line, on both sides of the dado.
Use your widest chisel. I’m using a 2″-wide bevel-edge chisel.
With both edges scored deeply with the chisel, I can begin to remove some material. I use a router plane for this task, removing perhaps 1/32″.
Be sure to carefully clean up right to the chiseled wall of the dado; it’s important for the next step.
With the floor of the dado slightly relieved from the rest of the board, I now have a wall that I can use to guide my carcase saw. With a careful two-hand grip (one hand on the saw’s handle, one on the saw plate to gently press the saw against the wall of the dado) I begin to cut a shallow kerf to further define the dado’s wall. Precision is important here, but not in all regards: the saw must be kept perfectly aligned with the wall, but it’s okay if you slightly over- or under-cut the bottom of your dado. I’m shooting for about 3/16″ deep. Enough to align the shelves when it comes time to assemble, but not enough to unnecessarily weaken the sides.
Finally, with both sides cut to the desired depth with the carcase saw, you can set the router plane to take a rank cut to remove the waste as quickly as possible. The final two passes are set more lightly to smooth out the bottom of the dado.
The best shaving you can make is the thickest one you can take.
So there you have it. Simple, predictable, and efficient. And no specialty tools necessary. (Unless you consider a router plane to be a specialty tool, in which case, I would argue to the contrary if you intend to do more than a modicum of your work with hand tools).
The tavern table was a fun build, and quick, too. Relatively speaking. I compare everything now to the Windsor chair build that stretched on for three months. It’s amazing how simple everything becomes when all of the angles are at 90°. And how convoluted things become curves and angles that aren’t right come into play. I started the table on a Friday evening, and it was fully assembled by that Sunday afternoon.
I have a few pictures, but must apologize for the quality. The lighting in my house is atrocious, and outdoors isn’t any better. Our yard is a scrubby wasteland of sand and weeds a few blocks from the beach.
I was surprised how much visual interest this simple molding on the bottom of the aprons adds to the table. I’ve never used a detail like this before, but I’ve noticed that some sort of molding is present on the aprons of nearly every joint stool and tavern table that I’ve seen. Definitely worth the small effort to get this effect.
The legs were a blast to turn. The shape is very, close to the original, but I didn’t hold myself too closely to the details. I felt that they could use improvement, so I improved them. I’m very happy with the way these turned out. Plus, it was extra practice for my next Windsor chair! I’m still having trouble with the skew chisel on those beads – I find that to be the hardest part of baluster turnings.
Another tweak to the original design: I reduced the number of lower stretchers from four to three, and moved the long stretcher to the center. I did this so that the table can be used as a children’s dining table when we have a lot of company. My son is in a wheelchair and needs to be able to roll up close to the table; outer stretchers would prevent that.
I also used chamfers and lambs’ tongues instead of the simple roundover on the original. No reason, other than I like the way they look.
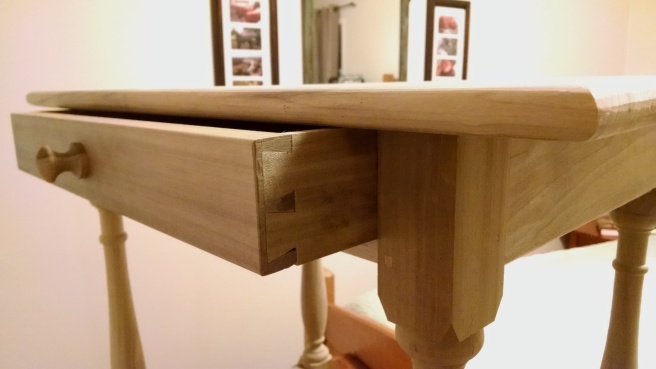
I do love drawer-building. Especially small ones like this. It becomes harder to make a smooth-running drawer as the size increases. This drawer fits nicely with maybe 1/32″ gap on the sides and 1/16″ on the top. It slides sweetly.
And of course dovetails are ever fun to cut.
I even found time to add a bit of bling to the drawer bottom. I have wanted to try some Peter Follansbee-style carving for years, and I finally made it happen. I didn’t want my first carving to be front-and-center on a piece of furniture, so a drawer bottom seemed appropriate. The carving is a bit of an anachronism – 17th-century English carving in an 18th century Charleston table – but it doesn’t bother me. Avert thine eyes if thou art a pedant.
The table still needs a finish. It will be painted, like the original. Unlike the original, I will not be using oil paint with toxic heavy metal-laden pigments. Milk paint will suffice. I’m thinking blue over yellow, with shellac topcoat.
I mentioned earlier this week that the pegged mortise and tenon is my favorite woodworking joint to make. One of the things that makes it my favorite is a feeling of competency and efficiency, and those are feelings that only come with practice. It makes a big difference when you begin a process with the expectation, rather than the hope, that everything will come together right.
I’ve been cutting mortises by hand since 2007, but it wasn’t until I built a commissioned Arts-and-Crafts office desk in 2013 that I truly felt comfortable with the process. That piece had over 100 individual mortise and tenon joints, more than half of them were through-mortises. Lots of practice, and plenty of time to refine my technique.
There are certainly no shortage of methods to try.
Christian Becksvoort pre-drills the mortises with a doweling jig and cleans it up with a sash mortise chisel. I’ve not found that pre-drilling the holes saves any time – unless you have really wonky grain, in which case the chisel will tend to want to follow the grain if you don’t pre-drill. Best to use straight-grained stock instead.
Chris Schwarz no longer uses this method, but he once wrote about a method of drilling a hole in one end of the mortise and then chiseling back from that hole until you reach the opposite end (the “Maynard technique”).
Peter Follansbee uses a traditional mortise chisel and starts by cutting a vee in the middle of the mortise, then working his way back to the ends. I really want to like this method, and I’ve tried it several times, but I find that my accuracy is compromised by switching the bevel back and forth like he does. I like to get my chisel in the right position and keep it there.
Which is why my preferred method is something along the lines of what Paul Sellers does. Actually, “along the lines” is dead wrong; I chop my mortises exactly like Paul Sellers does. Oddly enough, I had never even seen him chop a mortise under I was gathering links about different methods for this very post. Our only difference of opinions: he prefers a standard bevel-edge, chisel, while I prefer the traditional mortise chisel.
So, on that note, a change of plans. I had taken a bunch of pictures that were intended to demonstrate the method I use, but instead I’ll just post Paul’s video instead. If a picture’s worth 1000 words, a video must be worth 10,000.
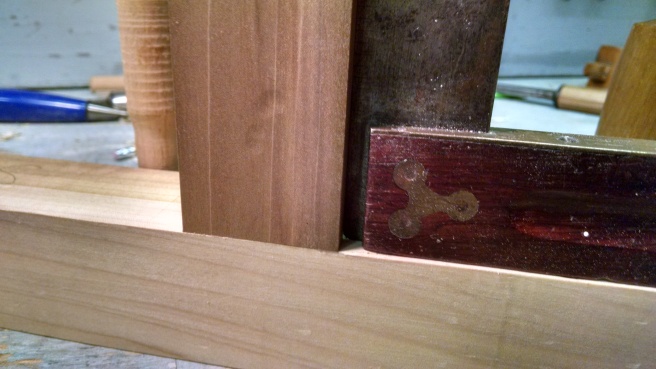
Okay, I can’t resist a bit of commentary on Paul Seller’s methods. In all of his videos where he’s mortising something, he’s holding the piece in his face vise. That sure seems like a good way to add unnecessary stress to your vise and the screws that are holding it in place. I mortise with my workpiece clamped to the benchtop, directly over a leg, using a holdfast or a big handscrew. Like so:
Also, I mark out only three sides of the mortise: the top, the bottom, and the edge that is closest to the face. The chisel itself defines the fourth side, so I don’t find it helpful to mark out the far edge. The only thing to watch out for with this method? Don’t chop your mortise on the wrong side of the line! Sometimes, when the mortise is close to the face (like in this example), it’s obvious which side to chop on. Other times, when the mortise is more centrally located, it’s not quite as clear. I have chopped on the wrong side of the line before, so I tend to draw a little squiggle on the side where I need to chop. (I don’t usually darken the scribe lines with a pencil, though- that was just for the picture.)
My tavern table had 10 regular mortises and four double mortises. The last four that I chopped measured 2″ long and 1-3/4″ deep. Out of curiosity, I timed myself and found that I chopped them in 4-5 minutes each. It’s quick and painless once you’re familiar with the process, and there’s nothing quite like sliding a joint together for the first time and having it look like this:
If you follow this blog, then chances are good that you follow Chris Schwarz’s remarkably prolific blog as well. If not, then perhaps this post deserves a bit of background. For the last couple of years, Chris has been deep down in the rabbit hole of “staked” furniture. I’ve followed it with curious interest, but along with his foray into campaign furniture, it’s not exactly my style, so I haven’t really been tempted to play along. “Staked” is a term used in early estate inventories used to describe furniture that consists of a wide slab top, with simple legs mortised through the top. The joints can rely on a cylindrical or cone-shaped tenon, but either way, it’s basically the same joint that affixes the legs to the seat on a Windsor chair.
The joint was prolific in Europe for hundreds of years, being used in everything from stools and benches to tables and chairs. As joinery became more complex and tastes in furniture more discerning, its use fell out of favor for all but cruder furniture and a few other specialized contexts.
Windsor chairs avoid the crude look engendered by staked joinery by virtue of elegant turned legs and a comfortably shaped seat. A flat-topped table has more trouble shaking of the humble look of the joinery. Yet the technique does have one distinct advantage: it’s fast.
My wife wanted me to build a play table for my two-year-old son. She wanted it soon. “I don’t care if you nail it together, I just want it done.” She had been asking for weeks, so her impatience was justified. However, I tend to put things off until I can find the time to build a true object of beauty. She quickly objected that children’s play table needn’t be a thing of beauty. Counterproductive, really. A play table is something that should be used and abused without fear of rebuke. Paint, crayons, markers, Play-Doh, glitter-glue. These humble playthings are instruments of doom to a fine piece of furniture.
A staked table was just the answer. So, two nights ago, I walked into my shop at 8:30 PM after the rest of my household was asleep. At 10:45 PM I walked out with a finished table in my arms – hand tools only, except the lathe. The tavern table that has been featured in my last two posts required 40 hours of shop time to build (you’ll get to see the finished object soon, I promise). The play table is about the same size, and I knocked this sucker out in 2 hours, 15 minutes. Now I know why this style hung around for a few hundred (thousand?) years. Economy of labor is a beautiful thing.
Here it is, in all of it’s humble glory. 23.5″ tall, 17″ wide, and maybe 30″ long? I didn’t measure, I just cut.The battens are nailed to the underside with cut nails, and the legs are bored straight through both batten and top. Three legs are beech, and the fourth is poplar (as is the rest of the table) The tenons are conical, so I used my tapered reamer to shape the mortises.Tables like this have cross-grain issues with the battens cross-grain to the top. Usually they develop cracks after a number of years. I preempted the issue by using a cracked board. The tenons are glued and wedged in place.I made no attempt to remove the gouge marks from the lathe. I could have used the skew to get a smoother surface, but what would be the point?
Despite not measuring a damn thing on this table (except the height), the angle of the legs turned out pretty close. I really don’t think I could have done better if I was measuring instead of eyeballing.
And the best part about a quick and dirty table? I was happy to let my 4-year-old daughter help me with the paint job. And she was excited to help.
How long will this table last? 10 years? 25? 100? I have no idea, but I have no doubt that it will serve its purpose for as long as we need it.
The pegged mortise-and-tenon: my favorite joint in woodworking. And not just any pegged mortise-and-tenon. When reasonable, I prefer to drawbore my joints as well. If you aren’t familiar with drawboring, then best to head straight to the expert himself: Peter Follansbee. This post is just as excellent today as it was when he wrote it seven years ago. And drawboring is just as effective today as it was 400 years ago.
What I’d like to talk about today, though, is a very specific part of the joint: the pegs (or pins). For a while, drawboring gave me fits every time I tried it. It seemed like 1 in 4 joints was a failure – either the peg would fail to snake its way through the offset and end up breaking, or the face of the mortised piece would crack as the peg was getting seated.
I couldn’t figure out was I was doing wrong. Too much offset in my holes? Were the pins too big? As it turned out, the problem was indeed my pins, but not so much the size as the shape.
Here’s a picture of the very first piece where I used pegged mortise-and-tenons. It’s a Shaker-style cherry table that I made in 2007, I think. Not drawbored – the joint was glued up, clamped together, then I bored through the joints and drove the pegs. For this piece, I simply grabbed some offcuts of cherry and turned them to dowels 1/4″ in diameter. Worked fine for this piece – there was no offset to snake through, so the pins went home without any fuss. But unbeknownst to me, this technique was the beginning of all of my drawboring woes.
Fast-forward to 2011. I was building a queen-size Arts-and-Crafts bed for my wife. The rails were 5′ long – a foot longer than my clamps. It was the perfect opportunity to try a bit of drawboring, since the pegs will pull the joints tight, rather than relying on clamps. I resorted to the method that I had used many times before for pegged joints. I grabbed some offcuts of white oak, split them to get straight-grained pieces, and turned them to size on my lathe. I even gave the ends a really good taper to help the pegs find their way through the offset.
What a nightmare. I think I busted two of the pegs completely as I was trying to drive them home. There was nothing I could do but watch helplessly that the oak shattered underneath my hammer. Luckily, the joints were pretty tight already, and made to tolerances that allowed the glue to hold the joints together without relying upon the pegs, but it was still painful to watch after hours of careful preparation.
You can still see just a bit of damage to the peg in the photo above that did’t quite disappear when I pared it flush. Luckily, this is all the evidence that remains of that failure.
I tried a few more methods after that. I shaved some straight, octagonal pegs, rather than round ones. No dice. I tried reducing the offset of my drawbores to a mere 1/16″. That works, but the joints don’t always pull as tightly as you would like. Finally, I stumbled upon Peter Follansbee’s work and the scales fell from my eyes. As it turns out, the root of my problems was the taper of my pegs.
I had been working with what were essentially straight pegs, with just a small taper at the tip – basically sharpened like a pencil. The problem with this shape is that the peg doesn’t get a chance to snake its way all the way through the tenon before the peg hole fills up and meets strong resistance. It occasionally ends up being too much resistance to overcome, and the pegs shatter before they can be driven down tight.
The solution? Instead of a short, blunt taper at the tip, now I use a taper that continues the entire length of the pegs. Like these:
For a 5/16″ peg hole, these pegs start off at maybe 3/16″ at the tip and taper gently to a bit over 5/16″ at the butt. They’re more or less octagonal in cross-section, gradually changing to a square at the butt, but I’ve found that the cross-section matters less than getting the taper right. They can’t be too big a the tip or you’re asking for a failure.
I should mention, too, that riven wood is absolutely critical. Don’t try to do this with a store-bought dowel. Keep some dry offcuts of oak, hickory, ash, or sugar maple. Split out what you need. I like a peg about 5″ long – enough to handle easily while I’m shaving them. I use a sharp chisel to get a square taper, and then cut the corners off with a knife. You can do the whole thing with a chisel if you want.
Get it started with the pinhole over a doghole, or hanging off the edge of your bench. These pegs need to go all the way through.
Stop driving when you meet strong resistance. You can feel and hear the difference when these pegs are fully seated.
Then cut the pegs close to the surface with a backsaw – careful not to mar the surface – and pare them flush with a wide chisel.
There were 20 drawbored mortise-and-tenons in this table frame – and not a single failure. My success rate has improved tremendously since I started making proper pegs.
I was finally ready this weekend to begin the undercarriage assembly for my chair. It was a bit nerve-wracking. There are several hours’ work in the leg and stretcher turnings, and I was in no mood to ruin them with a ham-fisted boring job.
It’s not at all intuitive to deduce the proper boring angles. There are four legs, three stretchers, and six joints that connect them all together. And there is precious little room for error. And even if you know the right angles, how do you ensure that you’re drilling at that precise angle?
It turns out that there is indeed a method to the apparent madness. I watched this video by Curtis Buchanan twice last week in preparation for this exercise.
At the heart of process is a very simple but very ingenious jig that holds your workpiece while you drill and lets you see the angle that you’re drilling with the help of a bevel gauge and a mirror.
I spent Saturday morning building my own version of the jig out of some cypress and poplar scraps.
This is the view while you’re boring – you can just glance over to your left to line up your bit with the bevel gauge, which is set to the appropriate drilling angle.
With the jig built, I was able to bore the legs quickly and accurately. When it was time for assembly, the joints went together snugly and without complaint.
I wedged the legs through the top of the seat, trimmed them off, and finished scraping and sanding the seat.
I did get a little overzealous while I was trimming the legs flush with a gouge – I ended up taking a chip out of the seat right beside the gutter! Luckily I was able to locate the miscreant chip and glue it back in place with a dab of superglue. The chip is just to the left of the leg-hole, but you’ll never see it again once this chair gets painted.
I’m ready to carve the seat for my chair – one of the parts of the build that I’ve been looking forward to the most – but first, I need to get the legs fitted up. I start by reaming the holes to a 6° taper, using the tapered reamer that I built a few weeks ago. The tapered mortise make a stronger joint than a cylindrical mortise, plus it makes the chair easier to to assemble, so it’s the perfect joint for the leg-to-seat connection. I clamped the seat to my shavehorse so I could work on it at a comfortable height and give room for the reamer to poke through.
I set my bevel gauge to the desired angle, minus 3°. Since the angle of the reamer is 6°, cutting that number in half and sighting with the bevel gauge will result in the appropriate angle. Sight the angle every few turns. Once I have it nailed, I can keep reaming until the hole is tapered all the way through.
The angle is just a bit off here…
…but now it’s corrected.
When the mortises are reamed, I can set my sight on the matching tenons:
I use a pair of calipers and a parting tool to get the tip down to 5/8″.Starting off, the tenon is too big and not tapered.I turn it down to the correct taper, but it’s still too big.Now it’s getting close. Time for a test-fit.On the first try, it looks good from above. But not poking through all the way below. Back to the lathe. On the second try, the fit is just right. Three more to go.And there it is. Four legs fitting snugly into their mortises. Now the carving can begin!


")
")
")
")
")
")


 Fast-forward to 2011. I was building a queen-size Arts-and-Crafts bed for my wife. The rails were 5′ long – a foot longer than my clamps. It was the perfect opportunity to try a bit of drawboring, since the pegs will pull the joints tight, rather than relying on clamps. I resorted to the method that I had used many times before for pegged joints. I grabbed some offcuts of white oak, split them to get straight-grained pieces, and turned them to size on my lathe. I even gave the ends a really good taper to help the pegs find their way through the offset.
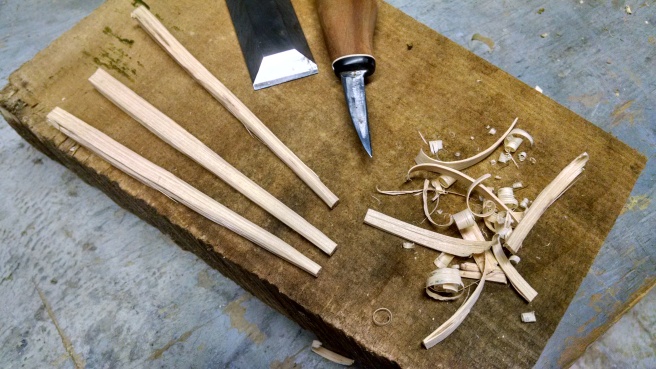


")
")


