A Revelation

One of the reasons I was most looking forward to Greenwood Fest was for the opportunity to look over Dave Fisher’s shoulder as he did some letter-carving. Dave is a maestro at this work (for example, herehere and here). He has even done a blog post specifically about lettering. But a blog just didn’t quite give me the confidence to try it – I wanted to see it in action.

To be honest, I have tried letter-carving in the past, but I was never particularly happy with the results. In fact, I actually carved my initials into the very first spoon I ever carved, six years ago in 2010. I had no sloyd or spoon knives at that point. I carved the whole thing with a gouge and a drawknife, and then I carved the letters with a chisel. The spoon is quite good – I still use it every week:

6 JAT
Despite being made from a soft, open-pored wood (catalpa), this thing still does an admirable job of scooping mashed potatoes onto a plate.

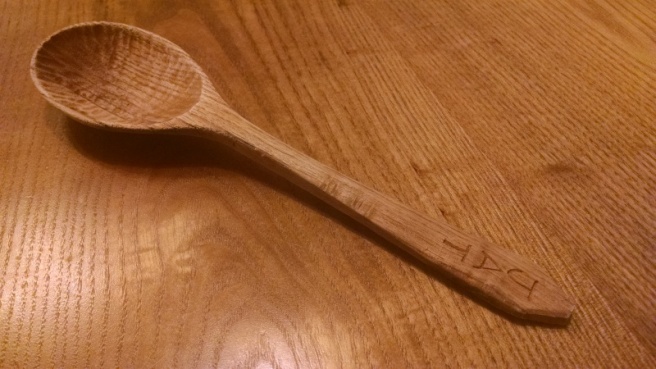
And the letters are neat enough, but also pretty bland and lifeless. Not something I really want to showcase on all of my spoons:

7 JAT

I didn’t try to carve letters again for three more years. When my first son was born in 2013, he spent nine days in the NICU. There wasn’t much that I could do for him, but could carve a spoon for him. I decided to try carving letters again. By this point, I had proper spoon-carving knifes, so I attempted to do the letters with the tip of my sloyd knife. The sentiment was laudable, but the execution was not. It’s the thought that counts?

8 Elam
Sweet sentiment, sloppy execution. Sorry, Elam.

Anyway, after that I was pretty much ruined on letter-carving until I had some proper instruction. After quizzing Dave about his tools, techniques, and unspoken wisdom, I was ready to give it another go. The biggest takeaway? A knife with a short blade and a rather tight radius near the tip seems to be mission-critical. He uses the tip of a pen knife. I had this little guy which seems to be close to the proper geometry:

1 Pencil
The radius of the tip could be a little tighter, but it’s a lot better than a sloyd knife.

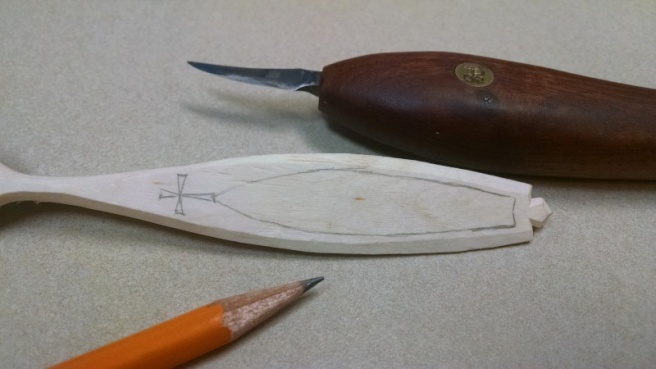
After sketching a simple design that I liked, I did my best to follow the lines, being careful not to cut too deeply (but also not being too timid either. No need to go over the same cut five times to get to the proper depth). Long, flowing lines like this were actually pretty easy to execute. It’s the stopping and starting that makes it tough!

2 Chips

3 Elam
Elam’s new spoon: a significant improvement.

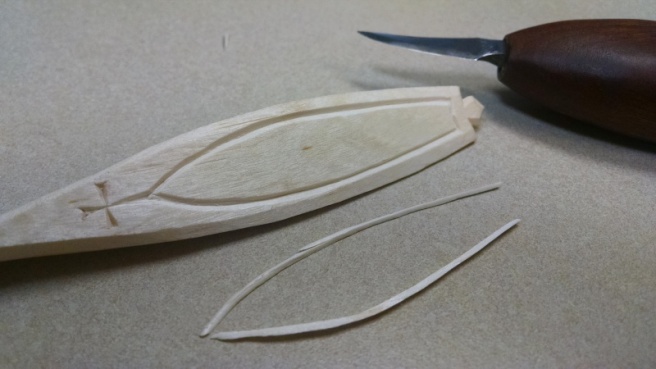
I was pretty pleased with how Elam’s new spoon turned out, but the cursive lettering was tricky. I highly recommend starting with all-caps font. Straight lines are a lot more fun than tight curves. It might be impolite when sending emails to your co-workers, but it’s perfectly acceptable to shout on a spoon.

5 Ellery
My daughter’s spoon turned out even better.

I was on a roll, so I decided to keep going. I carved a quick spoon while I was at Greenwood Fest and ate with it all week. Peter Follansbee made it “famous” on his first blog post after the event (sixth picture from the top). In honor of its provenance, I decided to give the spoon an appropriate name:

4 Green

So now I have a new skill that I’m not altogether embarrassed about. Score one for the home team, and Tip o’ the Hat to you, Dave Fisher.

Coming Back Down to Earth

If you follow the online greenwoodworking communities at all, then you’re probably well aware of the smashing success of Greenwood Fest in Plymouth, MA over the past weekend. Instagram, the Green Woodwork Facebook group, and Peter Follansbee’s blog have been aflurry with photos and positive comments since Sunday night. I was fortunate to be in attendance, and I can say without reservation that it was one of the most inspiring events that I’ve ever attended.

Really, I don’t even know where to begin. I still haven’t quite processed everything that I learned, nor fully appreciated the people I was able to meet. I met folks who have been a huge inspiration on my journey over the last few years, as well as folks who have slipped under my radar, but will now be certain to inspire me over the coming years.

I got to talk to Dave Fisher about bowl carving and lettering (more on that in a post to come):

DaveFisher
Dave Fisher at the stump.
FisherAleBowl
One of Dave’s incredible ale bowls. My wife promptly requested a bird-bowl when she saw his pictures.

I got to witness Peter Follansbee’s skilled and efficient carving first-hand:

PeterFollansbee
Peter showing off his carved oak panel.
FollansbeePlane
Peter takes advantage of any blank space that he’s given. I love his little scrub plane.

I talked with Tim Manney about steam-bending and chair-making. I’ve been absorbed with Windsors for the last year, but Tim actually got me excited about ladderbacks again. And if I ever build another shavehorse, it will be one of Tim’s design:

TimManney
Tim at the shavehorse.

One of the folks that I was most happy to meet stepped in at the last moment when another presenter had to cancel. If it seemed that Darrick Sanderson was under-the-radar when the weekend began, he was certainly well-known by the end of the week. Of course I was already quite familiar with him – I’ve been following his work for about six months and I was delighted when he got added to the schedule.

You may remember him from a post a while back: The Best Spoon I’ve Ever Seen. Well, I must revise my previous post. Darrick brought a whole chest full of The Best Spoons I’ve Ever Seen. Seriously. Every single one of them was amazing. His productivity, his creativity, and his control over form is demoralizing stunning. Like Dave Fisher, Darrick is one of those guys who is at the forefront of his craft, yet still finding a way to drive it forward. It’s a bit humbling, knowing that I was happily carving away in my little silo for 6 years, making perfectly nice spoons, but not doing anything particularly impressive. Meanwhile, Derrick burst through to the front of the pack in a couple short years, and the rest of us have been struggling to keep up ever since. He’s a special talent, and I expect that his impact and renown will continue to grow over the coming years.

If I seem like I’m gushing, just feast your eyes on this cornucopia of spoons. (And oh yeah, did I mention he also does wonderful carved and pole-turned bowls as well? I told you, he’s impressive.)

DarrickCornucopia
Darrick Sanderson’s spoons and bowls.
DarrickSanderson
Darrick at the pole lathe. I gave it a spin – lots of fun, but a bit intimidating when your first try is in front of a crowd!
DarrickSpoon
Seriously, this stuff is ridiculously good. Completely knife-finished spalted beech serving spoon. I should have bought this one. Still kicking myself.

So anyway, that was my weekend in a nutshell. Like the title said, I’m still coming back to earth. Not quite there yet, but I’ve already been putting some things that I learned into practice. I have a feeling this was one of those events that will stick out in my memory for a long, long time.


Bodging in 1935

To brighten up your Monday, I though you might enjoy this wonderful film of English bodgers from just 80 years ago, making Windsor chairs in a manner that would be entirely familiar to chairmakers 300 years ago (and indeed, entirely familiar to me today!) One thing that strikes me about the film is the height of the lathes used by the turners. Having learned on a more conventionally-sized lathe, I’d have a difficult time working at shoulder height, though it would certainly lend a closer view of the work. Hope you enjoy the video as much as I did!

Georgia on My Mind

Over the Easter weekend, I ventured to Colbert, Georgia to visit my family and to find the rest of the wood that I’ll need for the high chair. My parent’s homeplace is a sanctuary for the wood-lover. A mature pine and oak forest occupies most of the property, and nested within it are barns filled woodworking equipment, chainsaws, a sawmill,and a tractor with a front-end loader. Fields on both sides of the barns accommodate meticulously-stacked lumber and logs of all types that are ready to meet the same fate. Besides my home, there is probably no place else where I feel more ‘at home’.

My goal on this visit was finding a nice white oak log to provide bending stock for the continuous-arm rail and the spindles. My Dad certainly has no shortage of nice white oak logs. These beauties are bound for Kentucky to become whiskey barrels:

White Oak Logs
Hard to believe they can pay for logs in Georgia, ship them to Kentucky, and still make a profit. Must be good money in whiskey barrels…or at least in whiskey.

No worries, though; there was still plenty of stock to choose from. Besides, these logs had rings that were a bit tighter than I would prefer for bending stock. It is often assumed that faster-grown trees will yield weaker wood, but as I’ve said before, most often that is not the case. With ring-porous species like oak, faster growth actually yields stronger wood, which makes for better bending stock since the wood is less likely to splinter during tight bends.

White Oak Slow Grown
The whiskey-barrel logs had fairly tight growth rings: around 1/16-1/8″.
White Oak Fast Grown
The wood I selected grew much faster: growth rings were from 1/4″-3/8″ or more.

The downside of faster-grown stock is that the sapwood band will be much wider. My log had a sapwood band 2-1/2″ wide, compared to about a 1″ band in the whiskey-barrel logs. There’s nothing inherently wrong with the sapwood, but it begins to decay in a matter of weeks, versus years for the heartwood. Luckily, my log is very fresh and the sapwood will be fine to use.

In addition to wide growth rings, there was one more compelling reason for choosing the log that I chose. It was already split in half! My Dad is an experienced feller, but he had a slight mishap as this tree fell. A large branch on this tree caught a neighboring tree as it was falling, causing this one to twist on the hinge and splitting it for twenty feet up the trunk.

Split White Oak Log

I believe there may have been an impolite word uttered when the mishap occurred, but it was good news for me. I now had an entire log to choose my stock from, and it was already split in half! The first split is always the hardest, and it gets even harder as the log gets longer. Having a pre-split log not only reduces the work, but also allows me to place my cuts more strategically, since I can already see where the major defects are. It’s almost as good as X-ray goggles!

First things first: I needed a 40″ blank for the high chair’s arm rail. A full-size continuous-arm chair needs a 60″ blank, so I decided to go ahead and cut a 5′ section so I will have the wood I need on hand when I’m ready to build a full-size chair.

Sawing White Oak
My dad has always been a stickler for safety equipment, as you can see…

Having an ample number of wedges on hand made quick work of splitting out my arm rails.

Splitting White Oak

I also had plenty of nieces around to help out.

Splitting Helpers
Favorite quote of the day: “This doesn’t look like a chair.”

Finally, I cut some shorter bolts for spindles. I truly don’t believe I’ve ever seen a nicer-splitting white oak log. At least in the Deep South, white oak tends to be far more difficult to split than red oak, with lots of tenacious interlocking fibers on the radial faces and infuriating runout when splitting the tangential faces. No such problems with this log. A single wedge easily split this large bolt without complaint.

Splitting White Oak Bolts

In less than an hour, I had enough stock split out for at least five more chairs.

Riven Wood

I brought my stock into the forested shade and went to work with the drawknife. I do believe I had the best seat in the house.

Shaving Spindles


Turn a carpenter’s hatchet into a carving axe.

You’ve probably seen them stuffed piles in the cluttered tables of an old antique store or flea market. Kicking around your grandpa’s barn. Maybe you keep one in your camping gear (like my Dad does) for driving tent stakes and splitting kindling. I’m talking about the once-ubiquitous carpenter’s hatchet. These little guys were useful for trimming odd bits of wood to size or driving the occasional nail, but most carpenters these days wouldn’t know how to trim a piece of wood with a tool that didn’t have a cord or a battery pack, so these things mostly languish unused in forgotten corners.

I’ve had a carpenter’s hatchet head kicking around my toolbox for who knows how many years, always meaning to put a handle on it but never quite getting around to it. I’m glad I waited, because I finally figured out what to do with it.

For the last five years, I’ve been using a Gransfors-Bruks hunter’s axe  that I picked up for $50 (used) for spoon carving. It’s a great little axe, but the handle is about six inches too long so I always have to choke up when I use it. It’s not a convenient length for packing up when I want to do a bit of spoon carving away from home, either. Something needed to be done. I though about buying a new, smaller axe, but good ones don’t come cheap. Then I remember my old carpenter’s hatchet:

sunrise 003

It’s a terrible shape for spoon-carving. The hammer head places the balance too far back, the wide blade gets in the way of your fingers when you want to choke up on the handle, and the straight bevel makes it difficult to carve curvaceous spoon profiles. No problem though; I own a hacksaw.

The hammer head is the first to go.

sunrise 004

Next I turned my sights to a nice cutout for my fingers when I need to choke up on the handle:

wood 006

At this point, it’s still pretty rough-looking, but twice as functional as it was 15 minutes ago. I couldn’t resist prettying it up a bit with some work on the belt sander and some 220-grit hand-sanding. I also re-ground the straight cutting edge into a gentle curve:

Christmas 2015 045

That shiny look is nice, if that’s what you’re into. I know better than to think it would look like this for long, though. A clean metal surface like this is a magnet for rust when carving green wood. I gave it a soak in diluted vinegar overnight to tone down the shine.

Christmas 2015 046.JPG

Much nicer, in my opinion. All that’s left to do is give it a handle. I shaved some riven hickory to an octagonal shape, then dried it in my kiln for a couple of days before hanging the head.  I also darkened it up a bit more (and added some more rust protection) with some cold gun blue:

Axe 016

Not bad. But how does it work?

Very nicely. Very nicely, indeed.

Axe 020

I’ll admit, it will take some getting used to the shorter handle after 5 years of used a sub-optimal size. I think once I get the hang this one, though, it’ll easily be my favorite carving axe.

So, what have you got to lose? Hatchet heads like these are $5-10 at flea markets and on eBay. Maybe you’ve even got one in the junk drawer of your shop (like I did). A couple hours of work is all it’ll take to turn that forgotten tool into a fine carving axe!

The Birth of a Ladle

I was recently commissioned to carve a ladle for a good friend. I don’t carve ladles very frequently, because how many ladles does one man really need? (I think I have three in my kitchen, which is probably one too many). I was happy to fill the request. Ladles are the tougher to carve than a regular cooking spoon because of the sweeping curves and the deep bowl, but that also makes them fun. The best part is finding the right crook.

You can’t just carve a ladle from a straight piece of wood. You need to find a branch where the grain follows the handle, then curves abruptly where the bowl will be carved. Otherwise, you will end up with either a weak bowl or a weak handle.

no 002

You might be able to find a crook with the proper bend to it, but you’re more likely to find the abrupt bend that you need at a branch union. So the ladle begins with the hunt for a proper bend.

I had some red maple already cut up, and I picked out the bendiest piece that I had, but it wasn’t quite crooked enough. It will make a fine cooking/serving spoon, though.

Seat 019

A walk in the woods yielded a nice piece of redbay (Persea borbonia). Looks like it has a ladle in it to me. A close relative of avacado (Persea americana), this stuff carves beautifully – as long as you’re carving with the grain – but it does have some wicked grain reversals that can make it a challenge.

Seat 022

For most spoon blanks, I just split out what I need, but I’ve learned my lesson on Y’s. If you just try to split this out, chances are good that the bowl of your spoon blank will be destroyed. My method is to saw through the lower half of the blank until I get to straight wood.

Seat 023
Saw on the red line.

Then you can split the rest of the way using an axe, a wedge, or a froe with no problem.

Seat 025

I skipped a few steps at this point, but once you liberate your blank from the tree it’s just like carving any other spoon. A little axe work to remove most of the waste, then the rest is done with a sloyd knife and a bent knife and a lot of patience.

I finished this spoon up on my lunch break today. Here’s a few pictures. I can’t wait to deliver this ladle to its new owner. Mostly because I’ll be tempted to keep it myself if I don’t get rid of it soon. It’s quite a bit nicer than my earlier ladle efforts that I’m living with at the moment!

This slideshow requires JavaScript.


A Lonely Craft

It’s an unusual treat for me to actually have the opportunity to hang out with a fellow woodworker. We’re a scarce bunch, I suppose. Rarer still is the elusive green woodworker – those who make spoons, bowls, chairs, chests, etc. starting from green logs rather than dried lumber. Actually, as of two weeks ago, I had never met another green woodworker.

A couple weeks ago, I joined a green woodworking Facebook group and took notice when one of the posters referred to Cumberland Island, GA as “right across the state line from me”. Cumberland Island is less than 3 miles from my home, just across the St. Mary’s River. Just where is this guy? I sent him a message and asked where he was from. Turns out there is a fellow green woodworker just 20 minutes down the road from me in Yulee, FL.

We made plans to meet up at my house to swap stories and carve spoons. He brought along some fine red maple and I picked out a great crook to work with. I got to try out some new spooncarving knives (I still don’t own a hook knife – just a couple of bent knives –  but using Joey’s convinced me to put a hook knife on my Christmas list).

He brought along some of his own spoons to show me, as well as some from carvers all over the world. I have only seen my own spoons in person – most of what I’ve learned is from the internet – so it was a thrill to discuss the different styles and forms with someone who really understands hand-carved spoons. I also found a willing ear to talk about my Windsor chair. I know my wife is tired of my blathering about it.

I love this craft, but it has definitely been a lonely one for me. The irony of that statement is that spooncarving has the potential to be one of the most social woodcrafts of all – it doesn’t require a shop, the tools are few, and the materials are free. I find few things more enjoyable than to sit outside on a nice day and chat while carving, so I’m thankful to have made a green woodworking friend so close by. Thanks, Joey – let’s do it again soon!

IMG_20151128_120649194
Joey (right) and I with the fruits of our labor.

Here are a few pictures of my spoon from the maple crook:

This slideshow requires JavaScript.


Being a Green Woodworker Makes You Do Strange Things.

When I started my Windsor chair, I had resigned myself to the fact that I would not be able to get suitable spindle stock here on the island. My plan was to get as much done as I could before Thanksgiving, and when I visited my family in central Georgia on the fourth Thursday in November, I would snag some straight-grained red oak from my grandparent’s firewood stash.

Terry Kelly
Quick refresher if you’re unsure what the spindles are. Photo credit: Terry Kelly

After finishing up my shavehorse, though, I was eager to put it to use, so I decided to see what I could do with the wood on hand. Ideally, spindles are riven while green and fresh from a ring-porous hardwood like red oak, white oak, ash, or hickory. None of which grow with decent form or any sort of abundance on our coastal Florida island. I do, however, have a small stash of air-dried, quartersawn post oak (a species of white oak). I decided to rive out a few pieces to see if it could be worked dry.

It was an unmitigated disaster. The dry stock ran out while splitting. The splits could not be controlled like they can in green stock. I did manage to get two blanks that had promise, but the wood was rock-hard and even my well-sharpened drawknife would barely budge in the tenacious grain. Finally, I tried popping the blanks on my lathe, which yielded even worse results. Disgusted, I threw the stock into my scrap pile and once again accepted that the spindles would have to wait.

Today, though, I had a bit of a revelation. My wife is down to three weeks until her due date, so each week I take her to her doctor’s appointment and watch the kids for a half hour or so. Right across the street from the doctor’s office is a big sign for “FIREWOOD”.Firewood

I figured that they would mostly have live oak, which doesn’t interest me for spindle stock – too hard, and rarely straight-grained. But today I decided it was worth a closer inspection. We walked across the road and passed a mountain of split oak.

I noticed that much of the oak was actually laurel oak, a species of red oak, which should be a fine choice…if only there was some wood long enough and straight enough.

Mountain of Wood

I walked up to two young fellows and introduced myself.

“I have a bit of an odd request,” I said. “I’m a woodworker, and I’m building a chair. I need some straight-grained oak, and I was wondering if you would mind if I looked through your piles to see if I could find something I can use?”

One of them laughed and told me that he’s had much stranger requests. “Last week I had a fellow come by and say that he needed a piece of wood that couldn’t be split. Said he was trying to toughen his daughter up for wrestlin’ and he need something she could just pound on.” We shared a laugh and he welcomed to have a look around.

With that invitation, I spent the next 20 minutes searching the piles for stock that might be suitable. The main problem I found was that the vast majority of the wood was cut too short for spindles. I would prefer to start with 24″ stock, but I can probably make do with 20-21″. Most of the firewood was cut to 16-18″. Of the few pieces that were long enough for my purposes, even fewer had grain that was even remotely straight enough to use. But I picked around and finally had a small armload of  wood that I hope I’ll be able to use. I even picked up a short length of hickory for a hatchet handle.

I fished a crumpled $10 bill from my pocket and handed it to the fellow. He shook my hand and thanked me and welcomed me back any time if I needed more wood. I might do just that.

Spindle Stock


The Windsor Chair continues, but not without diversions.

The lathe work is complete. The three stretchers were easy – only 16″ long, and 5/8″ minimum dimensions. I left the tenons over-sized so I can turn them to their final dimensions once they’re completely dry.

The two posts, on the other hand…whew. 26″ long, and an almost comically-small 7/16″ at the tip. They were whipping around like a disco dancer as I was trying to pare the finished surface with the skew chisel.

Chair Parts
Here’s a handy reference, just so everyone can visualize the parts that I’m talking about. Photo credit: Curtis Buchanan. (No, my turnings are not as nice as his; you don’t have to point that out)

To keep the vibration to a minimum, I kept my left index finger on the back of the spindles as I was turning, opposite the cutting edge. It helped a lot, but there were still some spots where a little chatter was unavoidable. I’ve done this before when turning dry wood, and I had to use a light touch to avoid burning my fingers. I was actually happy to see that on the green live oak, I got a burnished buildup of gunk on my finger that seemed to reduce the heat and friction.

spoon 018
Burnished finger-gunk: One of the many benefits of green spindle-turning.

In any case, after a couple of hours, I had three stretchers and two posts completed. The lathe work is now complete, and the turning are set aside to dry. Next up: the seat.

spoon 020
Completed turnings

My ugly live oak log yielded a lot of waste, and I couldn’t help but try to make something useful out of the rivings that were too scant for spindles. Live oak is a tough wood to carve, but the results were delightful:

Live Oak Spoon

Oaky Legs and Smoky Butts

Saturday was my birthday. Which means I need to update my “About” page, since I’m no longer “nearly” 32 years old. When my wife asked what I wanted to do for my birthday, I had an easy answer. I wanted to spend the day smoking a pork butt.

I don’t know if there’s a better way to spend a Saturday. Get up early (but not too early), grab a bucket-full of shavings from the workshop, and light up a fire.

birthday 003

Slather a pork butt in salt and spice and sugar, and throw it on the smoker (my personal favorite cut is a picnic shoulder, but a Boston butt works too).

birthday 004

Now, kick back for the next 10 hours, enjoy a few ice-cold brews, and every hour or so shovel another heap of coals into the smoker and add another slab of oak to the glowing bed of embers.

birthday 024

Utter bliss. There’s plenty of time between tending to the meat and the fire to get a few things done around the house, but no time to leave. It’s self-imposed subjugation at its finest.

There were two things I wanted to get done: finish the shavehorse, and get started on the Windsor chair. I had been monkeying around with some wood property data and wanted to test the suitability of live oak for chair legs. Unfortunately, I didn’t have a lot to choose from, but I disappeared into the woods for a while and came back with this homely little specimen.

Legs (2)
That’s the pith I’m pointing at. For those of you keeping score at home, it’s supposed to be in the center of the tree. Yuck.

It’s ugly, but it’s the best I could muster. I cut two sort-of-straight 24″ sections out of it.Legs (3)

And set about riving it into useable billets. The devilish wood required two hatchets, two steel wedges, two dogwood gluts, and an obscene amount of pounding before it even thought about splitting.Splitting Live OakThis little tree had a dirty secret, a crooked past that it was trying to hide under a straight-laced veneer. I caught the first whiff of the evidence when I saw the off-center pith, but the truth was laid bare for all to see when it finally opened up.Crooked PastDevious little scoundrel. Oh well, once the first split is made, the hardest part is over. There wasn’t much left to do but continue splitting. Once I had the pieces riven down into quarters, I knocked off the crooked juvenile wood with a hatchet.

Juvenile Hatchet

The last split was the easiest. With the crookedest wood removed, I was able to split the billets into eighths pretty easily, and soon I had a whole stack of the grisly little things. Legs (12)

Nothing to do now but to pop them on the lathe and see how they turn. Turning these things round was a pretty nasty surprise as well. The long fibers left from the riving hang on with the tenacity of a tick, and when you turn the lathe on, they jump out and swat your knuckles like a bullwhip. It reminded me a lot of turning hickory.

Legs (13)

After a few minutes, I was able to beat the oak into submission once more, and I had a nice, consistent cylinder. A couple hours later, I had processed all of the rough blanks into 1 5/8″ cylinders.

Legs (14)Only one problem: I misread the plans. For the shapely baluster legs that I had envisioned, I needed a stack of 2″ blanks, not 1 5/8″.

Terry Kelly
These are the “baluster” legs that I wanted to use. Photo credit: Terry Kelly
Caleb James
But somehow I ended up with the dimensions for these “bamboo” legs. Photo credit: Curtis Buchanan

Damn. Well, there is one bright side: My wife actually prefers the simpler style of the bamboo legs. So, since she doesn’t actually read what I write, I get to pretend that I changed the design to suit her tastes. Score! Anyway, I hope for this to be the first of many Windsors, so I’ll just have to do the baluster legs next time.

Legs (16)

Honestly, I think it became apparent to me that live oak (at least, green live oak) is more suited to the reserved curves of the bamboo turnings anyway. I found it to be hard and splintery and really not very fun to turn. I also got a gunky buildup on my tools that I haven’t noticed as much when turning other green woods, which required re-sharpening even if my tools weren’t actually dull. I fear that live oak might chip out around the crisp details of the baluster legs, or that the gunky buildup on my tools would make those details more difficult to achieve. I suspect it would work a lot better if I roughed out the blanks and then waited for them to dry before attempting any baluster turnings with live oak.

I will say that I have no complaints about the results. I was able to achieve a very nice polish straight from the tools. This is important to me, because I consider avoiding wood dust (and the lung cancer that goes with it) high on my list of priorities. I would have no patience for this wood if I had to sand it as well.

Legs (17)

A few hours before this picture was taken, these legs were part of a living tree in the woods behind my house. Green woodworking never ceases to enthrall me – the connection between the raw material and the finished products is visceral and unforgettable. Three stretchers to go, and all of the parts for the undercarriage will complete. All they require is time to dry. The Windsor chair is underway!Legs (18)