Bodging in 1935

To brighten up your Monday, I though you might enjoy this wonderful film of English bodgers from just 80 years ago, making Windsor chairs in a manner that would be entirely familiar to chairmakers 300 years ago (and indeed, entirely familiar to me today!) One thing that strikes me about the film is the height of the lathes used by the turners. Having learned on a more conventionally-sized lathe, I’d have a difficult time working at shoulder height, though it would certainly lend a closer view of the work. Hope you enjoy the video as much as I did!

A Tour of the Aiken-Rhett House

Live oaks draped in Spanish moss. Sprawling mansions with double porches. Centuries-old masonry cloaked in creeping fig. Criminally deficient parking. All of this awaits you in beautiful and historic Charleston, South Carolina.

My wife and I (as well as our 4-month-old son) visited this weekend to attend the Lie-Nielsen Hand Tool Event and to take part in a tour of the Aiken-Rhett House. Unfortunately, I misread the dates on the tour arranged by Lie-Nielsen, and realized too late that the tour actually took place on Thursday, April 7, not on Saturday, April 9. Oops. After spending about an hour at the Lie-Nielsen Hand Tool Event (which was as much as I dared inflict upon my poor wife), we decided to take the house tour by ourselves. Though I was disappointed that the tour would not be led by a prominent local furniture conservator, the independent headphone tour proved well worth 12 bucks.

You can read a more comprehensive background of the house at the Historic Charleston website, but I’ll give you the short version here: The house was built ca. 1820 by wealthy Charleston merchant John Robinson. He fell on hard times and was forced to sell the house to William Aiken, Sr., who passed the home on to his son William Aiken, Jr. The younger Aiken would go on to become one of the governor of South Carolina and one of Charleston’s wealthiest residents. After he died in 1887 and his wife in 1892, the home passed on to their daughter, who passed it on to her sons, who lived in the home until the mid-1900s. In 1975, the home was sold to the Charleston Museum.

Remarkably, the home passed through the hands of only three generations of the same family between 1833 and 1975. Very few alterations have been made to the house since the mid-1800s. The current owner -the Historic Charleston Foundation – has taken a preservation, as opposed to a restoration, approach to the home’s maintenance. As a result, the tour gives you an incredible, time-weathered feel for the original grandeur of a historically significant Greek revival mansion. I have toured many old homes, and I can say that the only time I have walked away similarly impressed was after my visit to Longwood Plantation in Natchez, MS. In short, I highly recommend the tour if you ever happen to find yourself in the vicinity of Charleston.

The pictures of the home are probably more interesting than any more of my drivel, so I’ll just post a few of my photos with a brief description.

*Side note: if you’re viewing on a device larger than a smart phone, I must offer an apology for the quality of the pictures. In an attempt to economize my time, I tried some new bulk photo compression software, and it really made a mess of my photos. I didn’t notice how bad the quality was until after I had already deleted the originals. Mea culpa. I almost hesitated to even write this post, but the pictures look fine on a smartphone, and I figure that’s how half of you will be reading it, anyway…

Charleston 026
Front facade – the iconic two-story wraparound porch, so familiar in Charleston.
Charleston 030
A cute, simple child’s Windsor chair in the kitchen. Notice the awesome andirons in the background also.
Charleston 032
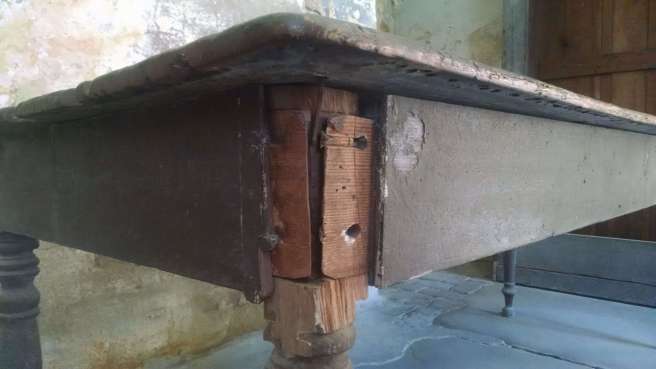
A peak inside the joinery of a kitchen table. Double-pegged mortise and tenons, with a cut nail driven through the top and into the leg to secure the top.
Charleston 034
Full view of the kitchen table.
Charleston 035
This diminutive chest has seen better days. From the slaves’ quarters.
Charleston 036
Detail of a cupboard from the slaves’ quarters. Heart pine, ship-lapped door boards, mitered cock-beading, and a nice cornice. The furniture of the kitchen and slaves quarters would find far more widespread appreciation today than anything in the main house. Funny how time changes things.
Charleston 040
Carriage house and courtyard
Charleston 041
The woodwork in the carriage house. The horses enjoyed a home with finer woodwork than people today.
Charleston 045
I love the simple, functional beauty of a wagon wheel.
Charleston 046
Gorgeous black finish on these finely-shaped balusters.
Charleston 049
Fine plaster work on the parlor ceiling.
Charleston 051
The parlor still retains much of its original early 1800s furniture.
Charleston 052
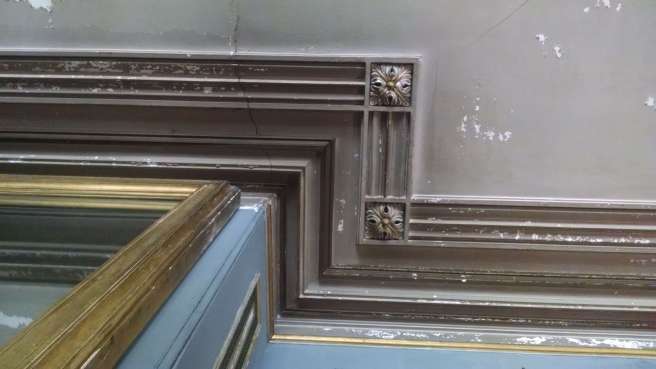
Wide frames-and-panels surrounding the windows. One of the joys of a stone building.
Charleston 053
Ghostly grandeur
Charleston 058
Odd little baluster profile that is quite common in Charleston. Rather than the more conventional square section at the top (to match the bottom), the top of the baluster is turned down to a ~1″ tenon, which fits into a round mortise underneath the porch rail. Certainly more economical of labor, but I’m not a big fan of the look.
Charleston 061
I have never been a huge fan of Greek Revival furniture, but seeing this dining table and its chairs at home in the mansion for which it was purchased provided a different perspective. They look quite at home in this room.
Charleston 062
Fantastically detailed staircase. These are the servants’ stairs, believe it or not.
Charleston 074
Detail of the balusters and newel post. 
Charleston 069
Gorgeous vanity with crotch mahogany-veneered drawer fronts.

The American Myth of the Continuous-Arm Chair

The now-ubiquitous Windsor chair has its roots in the simple, ancient stick-chairs of Great Britain. The Windsor chair is differentiated from other styles of chairs in that the seat plank serves the foundation for the entire the chair. The legs terminate in mortises below the seat, as do the spindles above the seat. Other historical forms of seating rely on the wood to serve merely as a frame for the seat, which could receive upholstery or woven reeds, bark, or cane.

Welsh stick chair
Welsh stick chair, proto-Windsor chair.

The stick chair evolved into what we would recognize today as a “Windsor” chair in England in the early 18th century, and the form was soon exported to colonial America, where the chair grew in popularity to become the dominant form of seating. From its humble beginnings, the Windsor chair evolved into a dizzying array of different forms throughout the 18th century – all of them originating in Great Britain before making their way across the Atlantic – with innovation continuing on into the early 19th century.

Though there is a fair amount of variation in the arrangement of legs and stretchers below the seat, chairs are typically classified according to what’s going on above the seat. For a solid primer on the different styles of Windsor chairs in the 18th century, I would suggest this article by Nancy Goyne Evans, the woman who wrote the book on American Windsor chairs (literally).

One of the last styles to be developed during the 18th century is also one of my personal favorites – the continuous-arm. According to Evans, “Regarded today as a classic in Windsor design, the continuous-bow chair was developed in New York City about 1790. The sweeping profile of the bow is based on the French bergère chair, examples of which were produced at this date by local cabinetmakers. This is the only eighteenth-century Windsor pattern based on a non-English prototype, and it is the only Windsor design dating before 1810 introduced to the American market in a place other than Philadelphia.

Given that Evans is such a widely respected authority on Windsor chairs, this statement has apparently carried some weight in the chairmaking community, because it is frequently repeated by chairmakers today. Witness Elia Bizarri’s remarks to Roy Underhill at around minute 1:20 in this video.

In fact, some have even taken it a step farther than simply stating the design originated in America; chairmaker Bob Dillon states on his website that the chair was “uniquely American, never appearing in Europe.”

And finally, some folks are frankly just somewhere out in left field with regard to this topic. Thomas Moser is undoubtedly a legend in the cabinetmaking community, but his website’s statement regarding the continuous-arm chair is more than a little suspect: “In about 1750, Rhode Island cabinetmakers came up with the idea of making the arm and the back of the chair from a single piece of hickory or ash, two types of wood that lend themselves to being steam bent and curved. While undoubtedly beautiful and comfortable, the Continuous Arm Chair took tremendous skill and patience to make, because of the need to form a compound curve with right angle bends.

I don’t believe there’s a shred of documentary evidence that points to a Rhode Island origin for this style, and certainly not as early as 1750. But let’s return Goyne’s statement that the continuous-arm is a uniquely American form. Observe these two chairs originating from the tiny town of Yealmpton, England:

Yealmpton

Looks very much like a continuous-arm to me.These chairs were recently sold at auction, being described as “Iconic Pair of ‘Yealmpton’ Continuous Arm Windsor Chairs”. I must thank the pseudonymous “Jack Plane” over at the fantastic blog Pegs and Tails for bringing this obscure style to my attention. He included a picture of the chairs in a post on English Windsors back on February 24 with the following description: “The chairs in figure 10 are of an egregious style peculiar to the town of Yealmpton in Devon which – whether for reasons of relative geographical isolation… or taste – thankfully didn’t pervade the country at large.

Personally, I find the chairs quite charming, if a bit peculiar. I would assume that Jack’s objection to the pictured chairs stems primarily from the regressive style of the turnings and the somewhat overstated radial splay of the the over-sized spindles. They look almost like the spokes of a wheel compared to the more subtle splay of conventional Windsor chairs. I certainly find no fault with the design of the continuous-arm, which almost looks as though it could be plucked from these chairs and placed onto a New York continuous-arm and hardly a soul would notice.

A quick Google search will confirm that, indeed, this style of chair is well-associated with the history of Yealmpton, which begs the question: which came first? The styles are simply too similar to have evolved independently of one another. The earliest American continuous-arms date from around 1790. In the comments on his blog, Jack states that the “Yealmpton chairs were in production prior to 1780“. If true, it means that the continuous-arm Windsor chair, rather than being the invention of some ingenious American chairmaker, is just another style imported from England, like all the rest.

(For the curious: I tried to do a bit of research on the topic myself, but frankly I’m at a loss as to where to even begin. The history of English antiques is very much a foreign topic to me. So instead I asked Jack himself – a former antiques dealer – if he knew of any primary sources supported the pre-1780 origin of the style. He said that his reference books were packed away at the moment, but that he intends to follow up on the topic himself. So keep an eye on his blog if you’re interested in a firmer conclusion to this saga.)

Even if further evidence demonstrates that the style did originate in the Old Country, that doesn’t mean that American chairmakers should feel any less pride in our chairmaking heritage. After all, unlike the rather unsophisticated, stump-legged chairs from the southern coast of England, the New York continuous-arm is an enduring icon: a refined symbol of good taste, comfort, and durability.

So, If You’re Going to Be in Charleston this Weekend…

…You should probably go ahead and book tickets to the special tour of the Aiken-Rhett house, arranged by Lie-Nielsen. I’ll be there! Think of how exciting it will be to finally meet a real, live blogger! And also, there will apparently be lots of decrepit furniture and a shabby old historically significant house and whatnot (if you’re into that sort of thing).

Chris Schwarz wrote about this event back in 2014, which you can read here. The details about the event (and the Lie-Nielsen Hand Tool Event which runs concurrently) can be found at the Lie-Nielsen website. And you can read more about the Aiken-Rhett house at their website, here.

Aiken-Rhett House Museum Tour

Date & Time: April 7th, 2016 (2:00pm to 3:00pm)

Location: 48 Elizabeth St. Charleston, SC 29414

Cost: $12 per person

Tour Details:

We’ve arranged a special tour of the Aiken-Rhett House Museum, a landmark historic home located at the corner of Judith and Elizabeth streets in Charleston.The Aiken-Rhett House was built in 1820, and remained in the hands of family and decedents for 142 years. Its rooms retain objects and decorations original to the home and its early occupants. Visitors will tour the home and its outbuildings, and experience the history contained therein.

We will meet at the Aiken-Rhett House Museum at 1:30pm on Thursday, April 7th. The tour starts at 2pm and lasts about one hour. If you are interested in joining, please call us at 1-800-327-2520 or email us at: toolworks@lie-nielsen.com to reserve your spot. Cost of admission to the museum is $12 per person. After the tour, at 4pm, we’ll head over to the American College of the Building Arts for a presentation by local furniture conservationist Russell Buskirk, followed by dinner and beers at the Craftsman Tap House at 6:30pm.

I know it’s a long shot, but if you’re planning to attend, let me know and I’ll be on the lookout for you. Living in the Deep South affords precious few opportunities to get a closeup perspective on early American furniture, so I plan to soak in as much of the experience as I can. Hope to see you there!


A Tale of Two Tripod Tea Tables

(And a lot of alluring alliteration?)

I mentioned yesterday that I ran into something interesting at the antique store on Sunday. Of course, it may only be of interest to me, but I hope not, because I spent a couple of hours writing about it.

Rural southern antique stores tend to yield some peculiar offerings. (I’m sure it’s the same everywhere; I can only speak to my own experience). But every now and then you come across something worthwhile, which keeps the experience fun. If nothing else, it’s an opportunity to pull out drawers and peek inside of carcases in ways that museums and your neighbors might disapprove. The store that I visited on Sunday had a couple of mahogany tea tables that were worthy of a closer look.

(Actually, only one of them was worth a closer look, but I thought it might be helpful to compare an interesting one with a non-interesting one, side-by-side)

IMG_0730

What is your first impression when you see the tables in the photo above? (Feel free to comment, because I’m curious what jumps out at other furniture-makers).

The tables are similar in their basic form: tripod tables, with legs joined to a central column, comparable in height, diameter, and footprint. But the differences are instantly apparent. The table on the left has a more pleasing finish: it looks smooth and matte, allowing the color and grain of the wood to take center stage. The table on the right has a glaring finish that obscures the wood and distracts the eye from the form. The table on the left has an attractively-shaped top, with a raised edge accented by six decorative C-scrolls. The table on the right has plain, round top with no raised edges.

That is where the credits to the table on the left come to an end. Looking below the top, we see that the right table has shapely, almost muscular legs. They look active and alive compared to the drooping, blocky legs on the table to the left.

More on the legs later. For now, let’s have a look at the columns (apologies, though, for the quality of these photos).


Though superficially similar, the turning on the right is far more competent and cohesive than the one on the left. On the column to the right, the variation in diameters is more dramatic and the separation of the various elements more assured. The column on the left features redundant repetitions of the elements above and below the urn; it lacks the punctuating bead on the upper portion of the taper; and the transition from the tapered section atop the urn to the wider part that supports the tabletop is slow and uncertain.

Now, back to the top for a closer inspection.

IMG_0733

The plasticky film of polyurethane notwithstanding, the top of this table is a nice piece of wood. I didn’t measure it, but I would estimate it to be ~26″ wide from a single plank of solid mahogany. I will criticize the rim, however. Not every tea table can have a laboriously-carved pie crust top, but this table would definitely have benefited from a turned, raised edge.

The other table has a nicely carved edge, but all is not as it seems…

IMG_0745

Notice in the picture below, the tell-tale clue of veneer separation:

IMG_0740

And of course, if you examine the edge, you’ll see the sandwich of applied carvings, mahogany veneer, solid wood, followed by another layer of delaminating veneer. The shaping of the edge below the applied moldings is pretty half-hearted as well.

IMG_0741

Alright now, let’s flip these things upside-down and take a look underneath:

If you haven’t figured it out by now, the story starts to unfold with these two photos. On the photo at left, look at how the leg is beginning to separate from the column. You can peek in (well, I could) and see the dowels that join the legs to the columns. Dowel joints were a mainstay of early-20th century Colonial Revival furniture – and that’s exactly what this table is.

Dowel joints are an inferior way to join two pieces of wood under almost any circumstances, but they are a particularly poor choice for a pedestal table, which, by design, keeps the lower portion of the joints under constant tension. A more typical apron table will only have tensioned joints when the legs are kicked or bent. The inadequacy of the joints is clearly demonstrated by the fact that it is already failing, probably less than 100 years into its existence.

The table on the right has legs joined by sliding dovetails bearing  the distinct irregularities of hand-cut joints. Note the complete disregard for the appearance of the underside – saw marks and gouge marks are left untouched so that more precious time can be spent refining the appearance of the visible elements. These are all signatures of genuine 18th-century craftsmanship. This table is, I believe, a genuine 18th c. tea table that was unceremoniously slathered in high-gloss polyurethane by some poor misguided soul. The original finish may be destroyed, but the legs, properly joined to the column with sliding dovetails, is still tight and solid ~250 years after it was built.

Now, more on the legs.

IMG_0744

I didn’t mention it above, but what really jumped out at me about the legs on the 20th c. table was the fact that they were completely inappropriate to be paired with the “pie crust” tabletop. This style of legs, with the beaded, concave upper surface, the unshaped sides, and the metallic foot, is Neoclassical, and would be at home in the early 19th c. on a “drum table“. The top is more typical of Chippendale furniture from the third quarter of the 18th c. So you have a mishmash of two styles separated by half a century that would never be found on an authentic period piece. It doesn’t matter how well-done the work is; if you combine a Neoclassical legs with a Chippendale top and a column that would not have been stylish in either period, you end up with an awkward and ungainly chimera.

On the other hand, the legs on the 18th c. table fit right in with the rest of the piece. They are curvaceous but not ostentatious, and very proficiently shaped.

IMG_0738

The transition from the legs to the column is far more competent than the other table as well (of course it helps that the style of the legs is appropriate to that of the column). Above the knees, the legs sweep upward, drawing your eye to the turned elements of the column.

IMG_0736

Finally, one more enhancement that the 18th c. table has over the 20th c. chimera: This one has the tilt-top that is typical of this period – a space-saving design that allows the table to be pushed up against a wall (or in a corner, depending on how the legs are oriented) when not in use. It’s more labor-intensive than a stationary top, but not so much as the more elaborate tilting- and rotating-tops that were also desirable during the period. A wooden pin fits into the battens, while a brass catch keeps the table from tilting during use.

IMG_0734

Now, where was the table built? I honestly have no idea, but my best guess is that it was imported from England. Still, it’s an attractive but relatively simple table that I would be pleased to own (after a thorough re-finishing job) or reproduce.

So what was the price?

IMG_0735

$275. I’m not an expert, but I don’t consider that a bad price for a genuine 18th-century piece (I could be wrong here, could be worth 5o bucks at auction, for all I know). But given the work that would be required to make it presentable again, I had to pass. I think the other table was in the neighborhood of $125, but I wouldn’t care to own it at any price.


Things That I Didn’t Buy

So I was driving home on Sunday afternoon, my hatchback and floorboards overflowing with a newly acquired fleet of bronze and iron, my wallet convulsing with pain. I passed an antique store. A really big antique store. I did a U-turn.

Now, before you go about staging an intervention for me, let me assure you that I wasn’t remotely interested in buying more tools. I do, however, enjoy the opportunity to see what kind of furniture awaits. Rural southern “antique” stores tend to be light on the antiques and heavy on the dumpster salvage, but you never know.

I was pleasantly surprised by what I found, but the pleasant surprises will have to wait until tomorrow. Today, I’d like to direct your attention to some tools that I didn’t buy on Sunday.

For example, I didn’t buy a kinked, black-spray-painted keyhole saw  with mismatched replacement nuts for $12:

IMG_0728

I didn’t buy a rusty, plastic-handled handsaw for $35:

IMG_0726

And I most definitely didn’t buy an “economy” brace with a chuck of questionable adequacy for $75:

IMG_0727

I wasn’t sure whether to admire the booth owner’s ambition or feel sorry for his ignorance. More of the latter, I suppose.

I did see one tool that was at least interesting to look at (in a different booth): a mahogany-handled ripsaw with a steel plate on the cheeks and domed brass nuts. I’ve seen one like this before that was in much better condition, at twice the price. I believe these things were often branded for specific hardware stores. Could be a beauty if it was cleaned up. But no, I didn’t buy it. My Disston 6 PPI No. 7 still works just fine, thanks.

IMG_0729

Do Your Cheeks Have Dimples?

A couple weeks ago, I posted about making a new carving axe from an old carpenter’s hatchet. The axe has gotten quite a workout since I made it, and I couldn’t be happier with it. One curious feature of this old axe head is a couple of dimples on its right cheek. I’ve seen similar dimples, years ago, on the back of a chisel. I can’t remember who first told me about their purpose, but I suspect many of my readers already know.

Spoon Blank (4c)

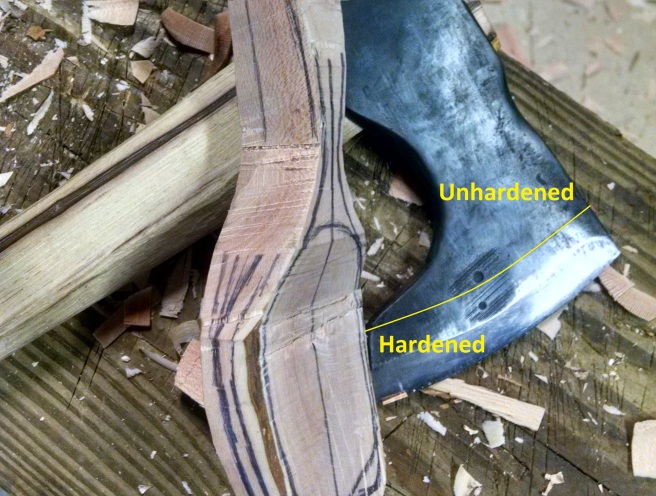
One clue about their purpose lies in the form of a faint color change in the steel about 3/4″ from the cutting edge. This line demarcates the change between hardened steel and the softer steel.

Spoon Blank (4b)

The hardened/unhardened steel combination is found in many tools, from chisels to knives to plane blades, but it serves an absolutely critical function in a striking tool such as an axe. The cutting edge must be quite hard to remain sharp after repeated blows into wood, but unfortunately there is a positive correlation between hardness and brittleness. If we made the entire axe head hard enough that the edge stays sharp, we also increase the likelihood that the blade will crack during use. On the other hand, if we make the steel soft enough that brittleness is not an issue, we also resign ourselves to a blade that will not hold an edge for more than a few minutes. The solution? Combine a soft but malleable steel body with a hard but brittle edge. The softer steel supports the harder steel to create a superior tool.

There are many ways to accomplish this task. Traditionally, a blacksmith would forge weld a piece of tool steel within a wrought iron sandwich to make an axe head. This works well and yields a robust blade, but it’s also labor intensive (and therefore expensive). The modern method is to forge the entire axe head of tool steel, then harden only the outer edge of the blade. This is the method that was used for my axe.

So what does this differential hardening have to do with the dimples on the axe cheeks?

Notice in the picture above that the smaller dimple is located well within the hardened steel area, while the larger dimple is located just on the other side in the softer steel.brinell

Those dimples are the vestiges of hardness testing done by the manufacturer to confirm that the axe head was hardened to certain specifications. In modern parlance, we tend to refer to steel hardness on the Rockwell scale. The higher the number, the harder the steel. Chisels and plane blades may measure around 60-62 Rockwell hardness. Axes will be a bit softer to remove some of the brittleness – 55-57 is typical for a well-made axe. Saws are softer still, since they must be sharpened by a steel file, rather than a stone, and “set” (that is, the teeth bent by a specific amount to either side), which a harder steel would not allow. A hardness of 50-52 is normal for saw steel.

Hardness is measured by forcing a very hard object (often diamond or tungsten carbide) of a specific size and shape into the object to be tested using a specific amount of force. The size of the the depression that is created provides a measurement of the material’s hardness. In the case of my axe, the depressions indicate that the object used for testing was spheroid, which means that a Brinell hardness tester was used. The formula for determining harness using the Brinell test is:

formula

Which is a fancy way of saying: the smaller the indentation (Di), the harder the steel. So, looking again at the dimples in my cheek, we see exactly what we would expect. The dimple near the cutting edge is smaller (and therefore the steel is harder) than the dimple right behind it. It’s pretty intuitive, actually. Unfortunately, we don’t know the diameter of the indenter (D) or the force used by the test (F), so we can’t estimate the hardness using the information available to us, but still…Go science!

I can anectodally state that the steel in this axe head is quite good. I would assume that a manufacturer that cares enough to test its blades is probably more likely to be one that will make a good blade in the first place. So, do any of your cheeks have dimples?


Of Timber and Tenets: A Yankee Chair in the Deep South

Windsor chairs are not exactly the iconic furniture forms in the Deep South that they are in New England. I’ve tromped around antique stores in Maine and seen enough lovely old Windsor chairs (and woodworking tools) to be jealous of my northerly woodworking brethren. The more humble ladderback is a much more typical find in a southern antique store. They’re easier to build and require a smaller toolkit, so it’s no surprise that the ladderback was the common chair in the more rural South.

rustic ladderback
Southern ladderbacks are typically austere, with simple turned or shaved posts and rungs and a seat woven from hickory bark or white oak splints.
Williamsburg Ladderback
Ladderbacks could be fancy, too, with elaborate turnings and rush seats, but the fancy ones (like this one from the Colonial Williamsburg collection) tend to come from New England.

Because the American Windsor style evolved primarily in New England, they came to rely heavily on the woods that were readily available in the North. Sugar maple is hard and strong, but turns beautifully, making it perfect for the delicate baluster turnings of the legs and rungs. White pine is light and soft and carves easily, allowing the development of more shapely seat designs. Oak, ash, and hickory are strong and bendy, ideal for thin, elegant spindles and curvaceous steam-bent backs.

All of those woods are common in New England – and even as far south as the southern Appalachians – but once you set foot on the red clay of the Piedmont, white pine and hard maple are suddenly nowhere to be found. There are substitutes, of course. Tulip-poplar grows well into Florida and as far west as Louisiana. Plenty of Windsor chairs are made with yellow-poplar seats. But they tended to be less shapely than their pinaceous counterparts. Poplar is 25% denser and commensurately more difficult to carve.

Sugar maple is even tougher to substitute. You can use red maple, of course, which grows from the east Texas swamps to the coast of Newfoundland. But conventional wisdom says that soft maple is conspicuously weaker than hard maple, so you’ll have to nix the delicate turnings in favor of a bulkier design. Beech is another option here, but it must be sawed rather than split, so grain runout is a problem if you aren’t careful.

Fortunately, most of the South is replete with oak, ash, and hickory, so the upper half of the chair isn’t so much of a problem…unless you live in the Really Deep South – the longleaf sandhills, the pineywoods and pocosins, the laurel thickets and maritime forests near the coast. If you live there, you’re basically screwed. Oh sure, there’s oak to be found, but it’s scrub oak* or live oak. Scrub oak is useless except for firewood, and live oak is great for ship-building but less exciting for chairmaking. Of course, I live on a little barrier island on the northeast coast of Florida, right in the heart of the chairmaking deadzone.

Boo-hoo. Cue the sad piano music:

OK, I’m not really complaining. I love where we live. And I’m certainly not here to pass on apocryphal dogma. I’m here to question everything. I’m the recusant woodworker, after all. Folk wisdom is nice and usually contains more than a crumb of truth, but what happens when we look at things from a scientific perspective? I am a wood scientist by education (though not profession), after all.

I intend to investigate some southern woods with a fine-toothed comb to see if might be possible to beat those snooty Yanks at their own game (I kid, I kid. It would be much easier if I could source sugar maple and white oak and white pine locally!)

Here’s a taste of the research I’ve been working on:

Slide1

Some of the results are surprising and encouraging. TBC…

*As a dendrology buff, I feel compelled to note that “scrub oak” is not a species, but rather a group of species, prevalent in the southern sandhills region. It includes turkey oak (Quercus laevis), blackjack oak (Q. marilandica), bluejack oak (Q. incana), and sand post oak (Q. margaretta), which all share a similar, scrubby growth habit and feature poor-quality wood. Great for wildlife and firewood, though!

Why Do We Aim For Perfection?

I’ll admit that I have a bit of a soft spot for crude antique furniture. I don’t mean crude in the sense that it’s poorly built or falling apart or left to rot for 50 years in a dank barn. I’m talking about the furniture that was built quickly and competently and well-used for a century or two, but without much consideration for the complete removal of surface blemishes and measuring marks. There’s something about the tool marks on a chair that connects me to the man who made it. Instead of seeing my own reflection in French-polished perfection, I see a window into another world.

Was the maker in a hurry? Was furniture-making his profession, or did he just build some chairs during the winter to pass the time before spring planting? Did he have a well-equipped shop or did he make do with a rough collection of tools? Did he take the time to sharpen his tools or did he press on with a plane that was well past due for grinding?

Every woodworker leaves a trace of his or her methods in one way or another, but in rough rural furniture, the questions and answers leap out at you before you even think to ask them. I was thinking of this after inspecting an old children’s ladderback chair that belongs to my niece. I sat in my brother’s living room inspected the chair for every tool mark I could find.

The chair probably originates from somewhere near the North Georgia antique shop from whence it was rescued. The paint color is a fantastic blue and red with stylized flowers on the back slats.

Children's Chair 1
Well-painted furniture only gets better as the years go by.

The real story is in the woodwork, though. The first surprise is the choice of the wood itself. This chair is made completely of yellow pine. It’s the only pine ladderback I’ve ever seen, and it probably only lasted this long because it was made for 30-lb toddlers instead of 200-lb men. Stranger still? The wood was riven (i.e., split from the log as opposed to sawed). That’s not unusual at all for chairs of oak or ash or hickory, but this is the first I’ve seen of riven pine for furniture. The riving marks are everywhere you look:

Camping Oct 2015 037 Camping Oct 2015 041

There’s evidence of hatchet work as well:

Camping Oct 2015 039
The flat spots on this foot appear to be the work of a hatchet. Also notice the grooves from the lathe work on the lower part of the foot. It appears the maker used a gouge instead of a skew chisel here.

The rungs were shaved with a drawknife, not turned. This is not unusual, but it’s interesting that the maker didn’t even attempt to make them round. They’re nearly square in cross section, with just the edges chamfered:

Camping Oct 2015 034
Very crude rungs.

The mortises for the back slats appear to have been cut with a pocketknife – and they probably were. Apparently this was common practice in southern Appalachia as documented in the first Foxfire book.

Camping Oct 2015 033
Notice the over-cut mortises. You can see where the knife scored the beads above the mortise.

Finally, a view from above. The maker didn’t even attempt to bend the slats – not surprising, since (a) yellow pine isn’t exactly known for bending well and (b) rough chairs like these were often made with flat slats anyway.

Camping Oct 2015 036
The slats weren’t bent as they are in more refined (and comfortable) ladderback chairs.

In spite of (or really, because of) all of its flaws and asperity, I love this little chair. Who knows how many diminutive derrieres have rested in this seat over the years? Its current owner is certainly a fan – I caused quite a stir when I took the chair into the yard to photograph and joked with my 4-year-old niece that I would be using it to start a campfire.

As we poked and prodded the chair, I mentioned to my brother that I would find it hard to make a chair with the same kind of surface quality as this one, even if I made a reproduction. I know I’m not the only woodworker who shoots for a higher standard in my own work than I look for in an antique.

So what’s the deal, then? Why do we insist on such perfection in our own work while admiring the crude pragmatism of the old?

My brother, who is not a woodworker, but is one hell of a musician, offered an analogy that I found interesting. Apparently there was a bit of a trend recently in British rock to sound intentionally rough and unrehearsed – the instruments were left just a bit out of tune, the music was played a little sloppy, the vocals maybe not quite on key all of the time. The idea being that the bands were aiming for the nostalgic imperfection of the Rolling Stones, rather than the flawless polish of Rush.

It sounds like a good idea. I’d take the Stones over Rush any day, right? The problem, however, was that the music ended up sounding, well, contrived – at least, to fellow musicians. They wanted to sound soulful and natural, they but instead they sounded like they were trying to be imperfect.

I think it’s this idea of striving for imperfection that I take issue with. I’m afraid that my furniture would not resemble the brisk work of a competent professional, but the formulaic inconsistency of those godawful “handscraped” floors that seem to be popping up everywhere these days.

Handscraped floors
WTF? Whose hands did you scrape these floors with? Wolverine’s?

One could argue that the man who made this chair had more in common with a garage band than the Rolling Stones, and they would be right. The truth is, he wasn’t at the top of his game. There are far better examples of chairs in the historical record, with more attractive proportions and more careful surface finish. I don’t think it matters, though. Have a look at this blog post at Popular Woodworking if you’d like to see an example of an 18th century masterpiece complete with turning marks and tearout from riving. The blemishes are smaller and more discreet, but they’re still there, and I still try to avoid them.

I think it takes a surprising amount of skill to pull off this sort of historically accurate imperfection. Robin Wood can do it with his medieval bowls and spoons. Peter Follansbee can do it with his colonial chests and joint stools. But both of them have more than a couple of decades of experience working with traditional tools in traditional ways. I’m but a neophyte hack compared to those men.

What it boils down do, I’m afraid, is that I chase perfection to hide my own lack of skill.