Georgia on My Mind

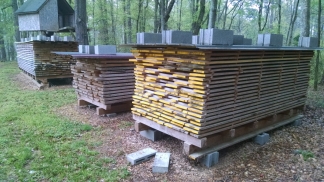
Over the Easter weekend, I ventured to Colbert, Georgia to visit my family and to find the rest of the wood that I’ll need for the high chair. My parent’s homeplace is a sanctuary for the wood-lover. A mature pine and oak forest occupies most of the property, and nested within it are barns filled woodworking equipment, chainsaws, a sawmill,and a tractor with a front-end loader. Fields on both sides of the barns accommodate meticulously-stacked lumber and logs of all types that are ready to meet the same fate. Besides my home, there is probably no place else where I feel more ‘at home’.

My goal on this visit was finding a nice white oak log to provide bending stock for the continuous-arm rail and the spindles. My Dad certainly has no shortage of nice white oak logs. These beauties are bound for Kentucky to become whiskey barrels:

White Oak Logs
Hard to believe they can pay for logs in Georgia, ship them to Kentucky, and still make a profit. Must be good money in whiskey barrels…or at least in whiskey.

No worries, though; there was still plenty of stock to choose from. Besides, these logs had rings that were a bit tighter than I would prefer for bending stock. It is often assumed that faster-grown trees will yield weaker wood, but as I’ve said before, most often that is not the case. With ring-porous species like oak, faster growth actually yields stronger wood, which makes for better bending stock since the wood is less likely to splinter during tight bends.

White Oak Slow Grown
The whiskey-barrel logs had fairly tight growth rings: around 1/16-1/8″.
White Oak Fast Grown
The wood I selected grew much faster: growth rings were from 1/4″-3/8″ or more.

The downside of faster-grown stock is that the sapwood band will be much wider. My log had a sapwood band 2-1/2″ wide, compared to about a 1″ band in the whiskey-barrel logs. There’s nothing inherently wrong with the sapwood, but it begins to decay in a matter of weeks, versus years for the heartwood. Luckily, my log is very fresh and the sapwood will be fine to use.

In addition to wide growth rings, there was one more compelling reason for choosing the log that I chose. It was already split in half! My Dad is an experienced feller, but he had a slight mishap as this tree fell. A large branch on this tree caught a neighboring tree as it was falling, causing this one to twist on the hinge and splitting it for twenty feet up the trunk.

Split White Oak Log

I believe there may have been an impolite word uttered when the mishap occurred, but it was good news for me. I now had an entire log to choose my stock from, and it was already split in half! The first split is always the hardest, and it gets even harder as the log gets longer. Having a pre-split log not only reduces the work, but also allows me to place my cuts more strategically, since I can already see where the major defects are. It’s almost as good as X-ray goggles!

First things first: I needed a 40″ blank for the high chair’s arm rail. A full-size continuous-arm chair needs a 60″ blank, so I decided to go ahead and cut a 5′ section so I will have the wood I need on hand when I’m ready to build a full-size chair.

Sawing White Oak
My dad has always been a stickler for safety equipment, as you can see…

Having an ample number of wedges on hand made quick work of splitting out my arm rails.

Splitting White Oak

I also had plenty of nieces around to help out.

Splitting Helpers
Favorite quote of the day: “This doesn’t look like a chair.”

Finally, I cut some shorter bolts for spindles. I truly don’t believe I’ve ever seen a nicer-splitting white oak log. At least in the Deep South, white oak tends to be far more difficult to split than red oak, with lots of tenacious interlocking fibers on the radial faces and infuriating runout when splitting the tangential faces. No such problems with this log. A single wedge easily split this large bolt without complaint.

Splitting White Oak Bolts

In less than an hour, I had enough stock split out for at least five more chairs.

Riven Wood

I brought my stock into the forested shade and went to work with the drawknife. I do believe I had the best seat in the house.

Shaving Spindles


The Whi-hi-ttling Is the Hardest Part.

My wife and I are quite a pair. If you hang around us long enough, you’ll notice that pretty much every conversation eventually devolves into song lyrics. I can’t help it. If you say “Who are you going to call?” you can bet your last dime that one of us with reply “Ghost Busters.” And if you tell me to “Stop”,  I will assuredly follow that up with a falsetto rendition of The Supremes’ 1965 classic or possibly even MC Hammer’s 1990 smash hit. It’s practically a Pavlovian response at this point.

It was only appropriate that I had a song running through my head on repeat while I was was carving my my spindles and crest rail on Friday night – Tom Petty’s  “The Waiting”. (Just scratch “waiting” and replace it with “whittling”. Good enough for me.)

It’s funny. If you just sit down and look at a Windsor chair, it would never cross your mind that making the spindles would be the hardest part of building it. Last week, I had my copy of Chairmaker’s Notebook sitting on my desk, and my boss came into my office and asked me if I was planning to build a chair. Yes, I told him, I’m halfway through a chair build as we speak. He was admiring the chairs in the book while commenting on how difficult the leg turnings would be. Then he pointed to the spindles and said, “But those would be easy to turn.”

Ha. Definitely the words of someone who has never actually turned anything, but I think that’s a pretty common misconception. The spindles are 1/2″ diameter at the base and 3/8″ at the tip, 20″ long. They are about as flexible as a cane pole and would chatter like a mockingbird if you tried to spin them on the lathe. No, the spindles are a job for the shavehorse and drawknife.

Terry Kelly

A difficult job at that. Getting long, smooth, consistent tapers is more of a challenge than it would first appear. I went ahead and worked up all of my white oak into spindles, which gave me enough spindles for two chairs, plus a couple extras. After all the throwaway pieces, though, I’ll be lucky to end up with enough to build just one. Part of the problem is the level of consistency required. The legs are far enough apart – and far enough from the eye – that small discrepancies won’t be noticed. The spindles stand side-by-side like seven skinny pawns, so the eye is immediately drawn to any defects.

A little layout goes a long way to ensuring consistency, but it’s still up to you and your drawknife to cut to the lines.

Seat 008
I started with 1″-square blanks
Seat 009
I used a 5/8″ Forstner bit to give me a guide for my bottom tenon and a 7/16″ bit for the top tenon.
Seat 017
After a few hours’ work, I had 18 roughly-shaped spindles, plus two crest rails. Good to have a spare in case something goes awry with the steam-bending.

The crest rail is a much more complex shape than the spindles, but I didn’t find it nearly as onerous to shape as the spindles. I supposed it helped that I didn’t make 18 of them. The work is not so repetitive, so it invites more presence of mind to the task, which was a welcome change to the spindle carving.

The crest rail blanks were severely twisted – probably 1/2″ of twist over 26″. Shouldn’t make a difference. Steam-bending can remove a twist just as easily as it can impart a bend. I just shaved right along with the grain and made sure I had the proper thickness all the way down.

You can see why planing these parts wouldn’t make sense. The plane would want to cut across the grain and remove the twist, but I want to preserve the integrity of the grain, and therefore, the twist.

Seat 012
These blanks were split from the same piece. Pretty cool how the twist matches up perfectly. The pieces sit neatly against one another even after shaving with the drawknife.
Seat 010
Used a template to lay out the curves.
Seat 013
Sawed a kerf down to the lowest point.
Seat 014
The drawknife does the rest. Loved the curly shavings on this piece.
Seat 016
Ready for bending.


Some Spindly Oak.

It has been a while since I wrote about my wood procurement escapade at the local firewood monger. Unfortunately, once I got the wood home I realized that the best stuff was 2″ too short, and the wood that was long enough to yield my 20″ spindles simply had too much defect to be used. So I scratched Plan B and reverted back to my original Plan A, which was to have my Dad (who operates a mobile sawmill in North Georgia) bring me some quality oak of the proper dimensions over Thanksgiving.

He came through with some fine white oak, 25″ long, from some sawmill waste:

thanksgiving 001

The only problem with the wood was that the the saw cuts did not follow the grain very well, which posed some problems when I tried to split out my spindles. To get even splits, it’s always best to split wood as perfectly into halves as you can. Otherwise, the grain will have a tendency to “run out” to the thinner side. With this stock, I couldn’t avoid splitting the pieces unevenly.

It turned out OK, though. The wood very easy to split radially (perpendicular to the growth rings), even when I was splitting odd-shaped pieces. Runout was more problematic when splitting tangentially (parallel to the growth rings) but I had plenty of stock even after ruining a number of spindle blanks.

I started the larger radial splits with a wedge.

thanksgiving 021

Once I had some ~1″-thick radial billets, I used the froe to divide them into 1″ x 1″ spindle blanks.

SPINDLES 003

Splitting wood is the easy part. After that, it was on to the shavehorse, where the real work begins. Two sides get shaved smooth and squared up with the drawknife. First the radial side, then the tangential surface. The radial face is much, much easier to shave. Shaving green radial oak feels like planing white pine. It’s incredible.

SPINDLES 006

Then I used a marking gauge to scribe a line 3/4″from the trued-up face, again starting with the radial face.

SPINDLES 005

Soon I had a whole gaggle of roughed-out spindles shaved to 3/4″ square. Notice that none of them – not a-one – is actually straight. Doesn’t matter a bit. The grain is perfectly continuous through the length of the spindles, and the drawkife is the only tool I have that is capable of pulling off this feat. Saws, planes, and lathes need not apply. When I build the chair, I will orient the bend in the same plane to give the back a pleasing curve.

wood 004

I quit for the night and popped the blanks into a plastic bag to keep them from drying out once I reached this point, but before I left the shop, I couldn’t help but shave one spindle down to shape. I will tackle the rest of them later this week, then they’ll get a ride in my kiln for about a week until they’re bone dry.