Designing My Workshop, Part 2: Other People’s Workshops

In Part 1, I shared a brief description and some lessons learned from each of my past workshops. Today, we’ll explore a few of the exceptional workshops of fellow woodworkers that inspired and informed my own design. (Be sure to click the links for a more in-depth look than I offer here). One thing you might notice if you’re familiar with these folks: They’re all Windsor chairmakers. Though it wasn’t a conscious decision to focus on the shops of Windsor chairmakers, it will come as no surprise if you’ve followed my interests on this blog. These guys use the tools that I like to use, and they work in ways in which I like to work. They designed their shops to be efficient with hand tools (and they know a thing or two about aesthetics to boot).

Greg Pennington’s workshop:

shop4

shop3

Dimensions: 18′ x 36′ (648 sq.ft. on the ground floor, plus a loft and porch)

Construction: Timber frame, asphalt shingle roof, clapboard siding, wooden floors and wall paneling.

What I Like About It: Okay, let’s be honest. Greg’s shop is freaking gorgeous. Exposed post and beam construction, endless expanses of wood from floor to ceiling, windows on every wall. If I had unlimited time, this is the kind of shop that I would prefer to build. It’s a big, it’s inviting, and it’s finished out to a tremendous degree.

But… Greg uses the space to teach chairmaking workshops for several students at a time. It’s quite a bit more space than I can justify for the work that I do and the equipment that I use. And though the idea of a timber frame is appealing, I lack the tools and experience required to do an efficient job of timber framing. I’m completely on board with the wooden paneling and big windows, though.

Curtis Buchanan’s workshop:

Curtis Buchananan Workshop

CurtisBuchananan Workshop

Dimensions: 16′ x 20′ (320 sq.ft. on the ground floor, plus a loft and porch)

Construction: Timber frame, metal roof, board-and-batten siding, wooden floors and wall paneling.

What I Like About It: At less than half the size of Greg’s shop, this workshop is an appropriate size for a single woodworker – after all, it’s been the birthplace of Curtis’ phenomenal chairs for more than 20 years. It features wood floors and paneling and windows throughout. I especially like the well-used porch that wraps around two sides. A porch is the natural place to use a shavehorse, and it provides a lot of extra workspace for minimal effort. The unpainted exterior is attractive, unpretentious, and it saves time and money.

But… Curtis’ only power tools are a lathe and a bandsaw. I will be looking to house a few more electron hogs than he does, so a bit more space might be handy.

Elia Bizzarri’s workshop:

EliaBizzarri Workshop

Elia Bizzarri Workshop

Dimensions: 18′ x 28′ (504 sq.ft. on the ground floor, plus upstairs)

Construction: Stick frame, metal roof, clapboard siding, wooden floors and wall paneling.

What I Like About It: Killer paint scheme. I would totally copy it, if it didn’t utterly clash with my green-and-tan house paint. Besides that, I love the big double doors for moving equipment in and out with ease and the triplet of north-facing windows above a massive workbench. Like the other two shops, the wall paneling and flooring is wood, and it has a loft for storage. The size is just about perfect. An under-appreciated design element that I really like is the generous roof overhang. In the balmy Deep South, where wood rots if you sneeze on it, adequate protection from the weather is critical if you intend to use wood siding.

But… I really want a porch on my shop. Besides that, this approaches my Platonic ideal.

______________________________________________

So there you have it. Those are the three workshops that were agitating my gray matter as I sat down to make plans for my workshop. From these shops, and from my own experiences, I made a list of, let’s call them “first principles” for my workshop design. I’ll cover them in the next installment.

Butterfly

“The caterpillar does all the work, but the butterfly gets all the publicity.”

-George Carlin

I felt like a caterpillar last week. My latest project involves an oak crotch so riddled with cracks and shake that would have been better suited to the firewood pile were it not for the alluring flame figure of the grain. Just making the slab usable involved inlaying a dozen butterfly patches to stabilize the defects. Few people will look at the end result and understand the work involved, but it was enjoyable work nonetheless.

I’ve always found butterflies to be a bit tricky to make by hand. They are small and annoyingly difficult to clamp. The solution is to keep them attached to a larger block for as long as possible.

1 Sketched
1) Mark out your cuts on a piece of wood that is quite a bit longer and wider than the butterflies that you intend to make.
2 Kerfed
2) Cut a few kerfs down to the “waist” of the butterflies. You can also cut between the butterflies, or you can wait until after the next step.

‘v

3 Chiseled
3) Using a chisel that is wider than your board, chop out the bulk of the waste, then carefully pare down to the lines, being especially careful to keep the sides of the butterfly perpendicular to its faces. Side note: Trying to cut these things using just a backsaw is a fool’s errand. You can do far more accurate work with a chisel, and it really doesn’t take any longer. Trust me, I’ve tried it both ways, and this is the way to go.
5 Finished
4) Now you can free the butterflies from the blank. On the opposite side, cut another kerf to the waist and remove the waste with the chisel.
6 Various Sizes
5) Now your butterflies are ready to inlay. I made a variety of sizes to avoid a monotonous look. I can match the size of the butterfly to the size of the crack.
7 Scribed
6) To inlay the butterfly, begin by locating it on the crack and carefully striking a line around it. Deepen the line with a chisel, tapping lightly with the mallet. The outlining is the most critical part of the inlaying process, so keep your focus and do it right.
8 Drilled
7) At this stage, methods will differ. Some people like to use a router to remove the bulk of the waste. I would rather sell my first-born to cannibals than use the screaming-devil-spinny-tool when it isn’t absolutely necessary, so I opt for a cordless drill and a Forstner bit instead. I shoot for a depth somewhere between 3/8″ and 1/2″. It isn’t critical, as long as it’s consistent.
9 Fitted
8) The remaining waste is evacuated with a few chisels. Very handy to have a bevel-edge chisel with a bevel that actually goes all the way to the edge for this task. It’s nice to get the floor as consistent as possible, but more of your focus should be on getting the walls vertical and cutting right-up-to-but-not-over the scribe lines.
10 Flushed
9) Don’t spare the glue when you put these things in. Tap it in with a hammer, saw it flush, and level it off with a hand plane. Ahhh, that’s a nice fit. Ten more to go…

This Is How I Dado It

Rabbets, dadoes, and grooves are the foundation of boarded furniture. You may ask what “boarded” furniture is, and if you do, then I would direct you to the same source from whence I learned the term: Adam Cherubini’s February 2012 article from Popular Woodworking. In that article, he states:

‘Boarded’ is an archaic English term that was used to describe a form of woodwork characterized by the use of fasteners [nails] as the principle means of attachment. The iconic 6-board chest is probably the most familiar boarded furniture form.

Builders of boarded items also had to deal with the challenge of joining boards at right angles. Many of us believe the best way to join boards is either with dovetails or mortise-and-tenons. Builders of boarded furniture typically did neither.

The idea of nailing boards together, rather than lovingly crafting each joint with dovetails and tenons to micrometer-approved specifications, might rub some the wrong way, but I have eagerly embraced this method over the past few years as an expeditious way to create attractive and robust furniture.

Boarded furniture is not without joinery, but the joints tend to have the function of merely aligning the boards for assembly with nails and/or glue, ensuring that each joint goes together squarely and without difficulty, rather than securing the structure together. You could assemble a pegged or wedged mortise and tenon without glue, if you wished, and it would still be almost as strong as the same joint assembled with glue. If you assemble a piece joined with rabbets and dados and omit the nails, your assembly will be fortunate to withstand a spirited sneeze.

To make sure we’re all on the same page before I go any further, let’s also discuss the differences between three similar joints: grooves, rabbets, and dadoes.

Actually, discussion takes too much time. Let’s look at a picture that I drew instead:

illustration 001
Groove: a three-walled trench that runs parallel to the grain; Rabbet: a two-walled recess that can run either parallel or perpendicular to the grain; Dado: a three-walled trench that runs perpendicular to the grain.


Grooves and rabbets are pretty easy to cut if you are a hand tool woodworker. To cut a groove, you use a plow plane. The fence is registered against the side of the board and cuts a groove a specified distance from the edge. The rabbet is equally easy to cut. Use a rabbet plane, preferably one with a fence. The fence can be fixed or adjustable. Rabbet planes with fences are often called fillister planes. If the fence is adjustable, it would be called a moving fillister plane. Again, the fence registers against the edge of the board and cuts the rabbet a pre-determined distance from the edge.

Now we get to the dado. The dado, you’ll notice, falls in the middle of the board, unlike grooves and rabbets, which are near the edges or the ends. This precludes the use of a fenced plane for making this joint. As a result, there is not one simple tool or method to making a dado by hand. Now, there is such thing as a dado plane. It’s just a simple rabbet plane with nickers on both sides to prevent tearout during the cross-grain cut. However, it’s not a stand-alone tool; it must be paired with a batten clamped across the board to guide the plane.

I’ve never used a dado plane, but I don’t particularly like the idea of a dado plane. First of all, how many would I need? A 3/4″ plane would handle the bulk of my work, but what if I wanted to cut a 1/2″ dado? Or a 1/4″ dado? Do I really want to buy and maintain another tool for every single width of dado I might possibly want to make? No thanks. I also don’t really like working using clamped battens as a guide. This is just a personal quirk, but they always seem to be in the way, and just a small bump out of alignment can result in some very bad words if it isn’t noticed in time.

Fortunately, there is a fairly simple and efficient way of cutting dadoes by hand, without any fancy specialty tools, which brings me (finally) to the point of this article: How I Cut a Dado by Hand.

Dadoes are typically cut in pairs; most often, their purpose is to hold a horizontal board (such as a shelf) to two vertical members (the sides). Therefore, to get the most accurate assembly, it make sense to lay the boards side-by-side to mark both sides at once. I use a framing square and a sharp striking knife to lay out the walls of the dado.

ToyShelf 012
(Ignore fact that I don’t have the sides paired together in this photo; I did, indeed, mark them as a pair).


With the dado defined, I follow the knife with a wide chisel, driving it with a few solid taps into the knife line. I do this along the entire knife line, on both sides of the dado.

ToyShelf 014
Use your widest chisel. I’m using a 2″-wide bevel-edge chisel.


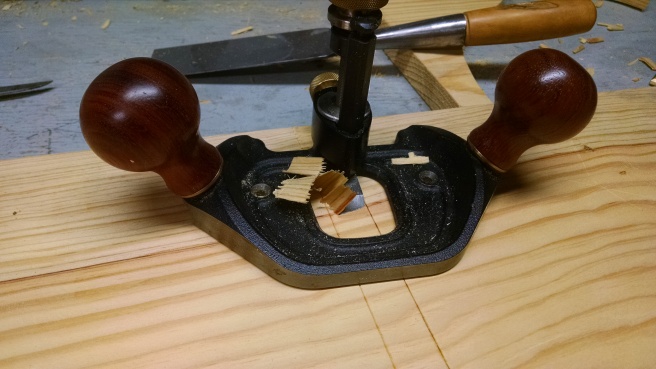
With both edges scored deeply with the chisel, I can begin to remove some material. I use a router plane for this task, removing perhaps 1/32″.

ToyShelf 015


Be sure to carefully clean up right to the chiseled wall of the dado; it’s important for the next step.

ToyShelf 016


With the floor of the dado slightly relieved from the rest of the board, I now have a wall that I can use to guide my carcase saw. With a careful two-hand grip (one hand on the saw’s handle, one on the saw plate to gently press the saw against the wall of the dado) I begin to cut a shallow kerf to further define the dado’s wall. Precision is important here, but not in all regards: the saw must be kept perfectly aligned with the wall, but it’s okay if you slightly over- or under-cut the bottom of your dado. I’m shooting for about 3/16″ deep. Enough to align the shelves when it comes time to assemble, but not enough to unnecessarily weaken the sides.

ToyShelf 017


Finally, with both sides cut to the desired depth with the carcase saw, you can set the router plane to take a rank cut to remove the waste as quickly as possible. The final two passes are set more lightly to smooth out the bottom of the dado.

ToyShelf 018
The best shaving you can make is the thickest one you can take.


So there you have it. Simple, predictable, and efficient. And no specialty tools necessary. (Unless you consider a router plane to be a specialty tool, in which case, I would argue to the contrary if you intend to do more than a modicum of your work with hand tools).

ToyShelf 020

In Defense of “Quick and Dirty”

If you follow this blog, then chances are good that you follow Chris Schwarz’s remarkably prolific blog as well. If not, then perhaps this post deserves a bit of background. For the last couple of years, Chris has been deep down in the rabbit hole of “staked” furniture. I’ve followed it with curious interest, but along with his foray into campaign furniture, it’s not exactly my style, so I haven’t really been tempted to play along. “Staked” is a term used in early estate inventories used to describe furniture that consists of a wide slab top, with simple legs mortised through the top. The joints can rely on a cylindrical or cone-shaped tenon, but either way, it’s basically the same joint that affixes the legs to the seat on a Windsor chair.

The joint was prolific in Europe for hundreds of years, being used in everything from stools and benches to tables and chairs. As joinery became more complex and tastes in furniture more discerning, its use fell out of favor for all but cruder furniture and a few other specialized contexts.

Windsor chairs avoid the crude look engendered by staked joinery by virtue of elegant turned legs and a comfortably shaped seat. A flat-topped table has more trouble shaking of the humble look of the joinery. Yet the technique does have one distinct advantage: it’s fast.

My wife wanted me to build a play table for my two-year-old son. She wanted it soon. “I don’t care if you nail it together, I just want it done.” She had been asking for weeks, so her impatience was justified. However, I tend to put things off until I can find the time to build a true object of beauty. She quickly objected that children’s play table needn’t be a thing of beauty. Counterproductive, really. A play table is something that should be used and abused without fear of rebuke. Paint, crayons, markers, Play-Doh, glitter-glue. These humble playthings are instruments of doom to a fine piece of furniture.

A staked table was just the answer. So, two nights ago, I walked into my shop at 8:30 PM after the rest of my household was asleep. At 10:45 PM I walked out with a finished table in my arms – hand tools only, except the lathe. The tavern table that has been featured in my last two posts required 40 hours of shop time to build (you’ll get to see the finished object soon, I promise). The play table is about the same size, and I knocked this sucker out in 2 hours, 15 minutes. Now I know why this style hung around for a few hundred (thousand?) years. Economy of labor is a beautiful thing.

staked 046
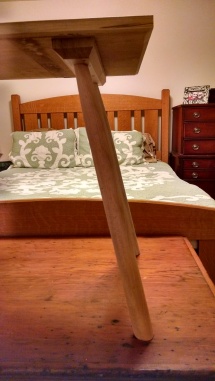
Here it is, in all of it’s humble glory. 23.5″ tall, 17″ wide, and maybe 30″ long? I didn’t measure, I just cut.
staked 058
The battens are nailed to the underside with cut nails, and the legs are bored straight through both batten and top. Three legs are beech, and the fourth is poplar (as is the rest of the table) The tenons are conical, so I used my tapered reamer to shape the mortises.
staked 050
Tables like this have cross-grain issues with the battens cross-grain to the top. Usually they develop cracks after a number of years. I preempted the issue by using a cracked board. The tenons are glued and wedged in place.
staked 057
I made no attempt to remove the gouge marks from the lathe. I could have used the skew to get a smoother surface, but what would be the point?


Despite not measuring a damn thing on this table (except the height), the angle of the legs turned out pretty close. I really don’t think I could have done better if I was measuring instead of eyeballing.


And the best part about a quick and dirty table? I was happy to let my 4-year-old daughter help me with the paint job. And she was excited to help.

staked 065

How long will this table last? 10 years? 25? 100? I have no idea, but I have no doubt that it will serve its purpose for as long as we need it.