
Rabbets, dadoes, and grooves are the foundation of boarded furniture. You may ask what “boarded” furniture is, and if you do, then I would direct you to the same source from whence I learned the term: Adam Cherubini’s February 2012 article from Popular Woodworking. In that article, he states:
‘Boarded’ is an archaic English term that was used to describe a form of woodwork characterized by the use of fasteners [nails] as the principle means of attachment. The iconic 6-board chest is probably the most familiar boarded furniture form.
Builders of boarded items also had to deal with the challenge of joining boards at right angles. Many of us believe the best way to join boards is either with dovetails or mortise-and-tenons. Builders of boarded furniture typically did neither.
The idea of nailing boards together, rather than lovingly crafting each joint with dovetails and tenons to micrometer-approved specifications, might rub some the wrong way, but I have eagerly embraced this method over the past few years as an expeditious way to create attractive and robust furniture.
Boarded furniture is not without joinery, but the joints tend to have the function of merely aligning the boards for assembly with nails and/or glue, ensuring that each joint goes together squarely and without difficulty, rather than securing the structure together. You could assemble a pegged or wedged mortise and tenon without glue, if you wished, and it would still be almost as strong as the same joint assembled with glue. If you assemble a piece joined with rabbets and dados and omit the nails, your assembly will be fortunate to withstand a spirited sneeze.
To make sure we’re all on the same page before I go any further, let’s also discuss the differences between three similar joints: grooves, rabbets, and dadoes.
Actually, discussion takes too much time. Let’s look at a picture that I drew instead:

Grooves and rabbets are pretty easy to cut if you are a hand tool woodworker. To cut a groove, you use a plow plane. The fence is registered against the side of the board and cuts a groove a specified distance from the edge. The rabbet is equally easy to cut. Use a rabbet plane, preferably one with a fence. The fence can be fixed or adjustable. Rabbet planes with fences are often called fillister planes. If the fence is adjustable, it would be called a moving fillister plane. Again, the fence registers against the edge of the board and cuts the rabbet a pre-determined distance from the edge.
Now we get to the dado. The dado, you’ll notice, falls in the middle of the board, unlike grooves and rabbets, which are near the edges or the ends. This precludes the use of a fenced plane for making this joint. As a result, there is not one simple tool or method to making a dado by hand. Now, there is such thing as a dado plane. It’s just a simple rabbet plane with nickers on both sides to prevent tearout during the cross-grain cut. However, it’s not a stand-alone tool; it must be paired with a batten clamped across the board to guide the plane.
I’ve never used a dado plane, but I don’t particularly like the idea of a dado plane. First of all, how many would I need? A 3/4″ plane would handle the bulk of my work, but what if I wanted to cut a 1/2″ dado? Or a 1/4″ dado? Do I really want to buy and maintain another tool for every single width of dado I might possibly want to make? No thanks. I also don’t really like working using clamped battens as a guide. This is just a personal quirk, but they always seem to be in the way, and just a small bump out of alignment can result in some very bad words if it isn’t noticed in time.
Fortunately, there is a fairly simple and efficient way of cutting dadoes by hand, without any fancy specialty tools, which brings me (finally) to the point of this article: How I Cut a Dado by Hand.
Dadoes are typically cut in pairs; most often, their purpose is to hold a horizontal board (such as a shelf) to two vertical members (the sides). Therefore, to get the most accurate assembly, it make sense to lay the boards side-by-side to mark both sides at once. I use a framing square and a sharp striking knife to lay out the walls of the dado.

With the dado defined, I follow the knife with a wide chisel, driving it with a few solid taps into the knife line. I do this along the entire knife line, on both sides of the dado.

With both edges scored deeply with the chisel, I can begin to remove some material. I use a router plane for this task, removing perhaps 1/32″.
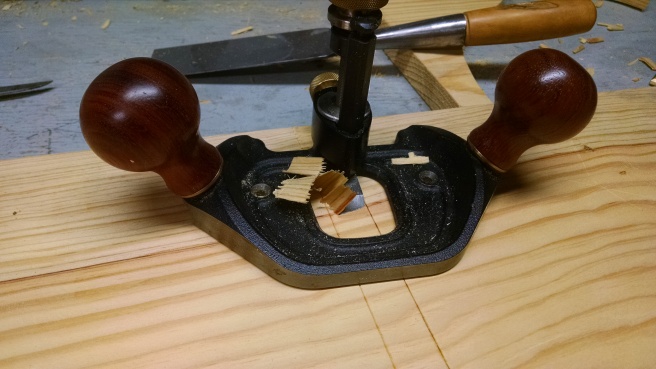
Be sure to carefully clean up right to the chiseled wall of the dado; it’s important for the next step.

With the floor of the dado slightly relieved from the rest of the board, I now have a wall that I can use to guide my carcase saw. With a careful two-hand grip (one hand on the saw’s handle, one on the saw plate to gently press the saw against the wall of the dado) I begin to cut a shallow kerf to further define the dado’s wall. Precision is important here, but not in all regards: the saw must be kept perfectly aligned with the wall, but it’s okay if you slightly over- or under-cut the bottom of your dado. I’m shooting for about 3/16″ deep. Enough to align the shelves when it comes time to assemble, but not enough to unnecessarily weaken the sides.

Finally, with both sides cut to the desired depth with the carcase saw, you can set the router plane to take a rank cut to remove the waste as quickly as possible. The final two passes are set more lightly to smooth out the bottom of the dado.

So there you have it. Simple, predictable, and efficient. And no specialty tools necessary. (Unless you consider a router plane to be a specialty tool, in which case, I would argue to the contrary if you intend to do more than a modicum of your work with hand tools).


Wow! love your explanation, and your tool! have some old ones from my granddad i should have a look at.
Usually would have done that with a mill.. thats what i would have learned at my furniture school..
but very interesting.. I love the difference between a groove in the direction of the nerve, and across the DADO.. have to look ask at school, what the dutch word for this. thanks!
LikeLike
Thanks, Ryan! Glad you found this useful. The mill you mention – would that be a rotary tool, similar to a router? There are, of course, many ways to cut a dadoes (as well as grooves and rabbets) with power tools: on the table saw with a dado stack, with a handheld router and a batten, on the router table, and on the radial arm saw, just to mention a few. I hate routers with a passion and avoid them at all costs. They’ve probably resulted in more buggered-up work pieces than any other tool. I dislike not being able to see the work as I’m cutting it on the table saw. And radial arm saws scare the crap out of me (shudder).
I don’t mind power tools at all for the heavy lifting (ripping stock, thickness planing) but I find that joinery is always more fun to cut with hand tools!
LikeLiked by 1 person