
Wow, I see that almost a month has passed since my last post on the tavern table. Hard to believe it’s been that long, but I’ve finally completed the finish after pecking away at it on evenings and weekends. I honestly think it may be the last time I use milk paint for a long while. I love the results, but it is ridiculously labor-intensive. Look for some experimentation with alternatives – oil paints and tinted shellac – in future blog posts.
When I left off, I had just burnished the second coat of ‘Goldenrod’ and applied a layer of orange shellac.
It’s a bit gaudy to modern eyes at this point, though I believe a color similar to this was pretty popular for Windsor chairs in the late 1700s (those folks liked brighter colors than we tolerate today).
The next step was to cover the Goldenrod with a couple coats of ‘Peacock’.

Originally, my plan was to paint the top the same color as the base, but once I got the Peacock on the base, I realized that the table actually looked really good with a contrasting top. I decided that a layer of red paint, judiciously rubbed through to the yellow below, might look even better.
Rather than marching forward with more milk paint, I decided to experiment with some oil paint instead:


The final step was to rub down the whole table with Scotch-Brite pads. I tried to simulate age by rubbing through the top coat in predictable locations: around the drawer knob, on the corners and edge of the top and legs, and especially on the tops of the stretchers where feet should rest. I stopped short of “distressing” the piece with dents, scratches, rasping, and sanding. I don’t have the willpower to spend the time on a good and realistic distressed finish, and a poorly distressed piece (AKA “shabby chic”) is, shall we say, not to my taste.

Finally, after an hour of burnishing, the table was ready for its final coat: a layer of home-brewed wiping varnish (1/3 boiled linseed oil, 1/3 satin oil varnish, 1/3 turpentine).
The final coat highlighted my second major annoyance with milk paint (the first being labor): It changes color dramatically when the oil is applied. I quite liked the blue-green appearance of the unfinished milk paint. But the second you apply the varnish (or oil, or shellac, or any other protective finish), the color darkens more than you might expect.


Now, don’t get me wrong: I’m quite happy with the final appearance of the table. I’m just annoyed that I couldn’t predict how it would look until after the varnish was applied. If I had a specific color that I was trying to match, I would have been far more annoyed. The nice thing about oil paints and tinted shellac is that the color looks pretty much the same when it’s mixed, when it’s going on, and when it dries. Milk paint, on the other hand, has one shade when you mix it, a different shade completely when it dries, and yet another completely different shade when you finish it. Unless you are deeply familiar with the product, it’s just unpredictable.
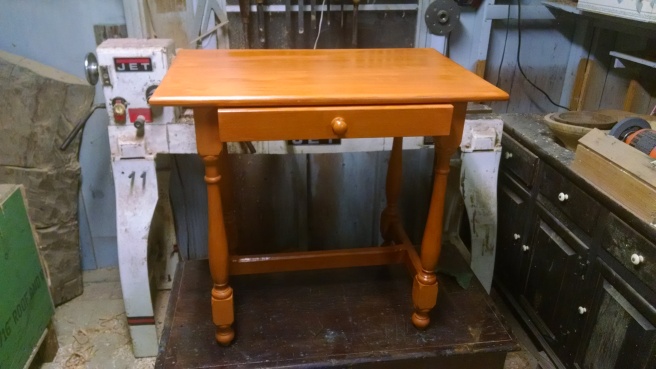
Anyway, enough of my ranting. How about some glamour shots of the finished table?

Very recently I’ve managed to get a better finish with milk paint. I was never happy with how grainy and globby it would end up on some of my spoons, so I’d rub with a 600 grit sanding pad to smooth things out. Not a bad look, especially when using contrasting colors, but not really what I wanted.
I bought the stiffest brush that Michael’s had, and started mixing the paint much thinner than before. I am thrilled with the results. If I ever get around to carving a spoon to swap you, you’ll see for yourself.
LikeLike
Thanks for your insight, Joey. That makes sense, and I’ve tried mixing the paint thinner before, but I never felt like I could get adequate build. Maybe more coats, less burnishing is the way to go, though. Painting is time-consuming on a furniture piece with lots of nooks and crevices, but it’s still far better than burnishing. I suppose more practice and experimentation is in order…or better yet, you could just show me. I look forward to that spoon! I’ve got one for you, whenever I see you again.
LikeLike
Forgot to mention, the table looks great!
LikeLike
Thank you!
LikeLike
I really like how this turned out! I never used milk paint and was considering it for a planned kitchen remodel. Thanks for spending the time to share your experience with it!
LikeLike
Thanks, Jon.
The decision on whether or not to use milk paint for a kitchen remodel should really depend on your expectations for the final appearance. The reason I find it so time-consuming and labor-intensive to use is because I buff it out to a smooth, satin sheen before applying the final finishing coats (and you certainly have to finish with shellac or varnish or something – uncoated milk paint will soak up everything that drips or splatters onto it).
Milk paint naturally dries to a chalky, rough finish. You could get by with a light sanding or burnishing if you want a more rustic look, but since that is not my goal, more work is required. I would definitely recommend some practice with milk paint on something small so that you understand what you’re getting into before tackling a project so large as a kitchen! Good luck.
LikeLiked by 1 person