
I mentioned earlier this week that the pegged mortise and tenon is my favorite woodworking joint to make. One of the things that makes it my favorite is a feeling of competency and efficiency, and those are feelings that only come with practice. It makes a big difference when you begin a process with the expectation, rather than the hope, that everything will come together right.
I’ve been cutting mortises by hand since 2007, but it wasn’t until I built a commissioned Arts-and-Crafts office desk in 2013 that I truly felt comfortable with the process. That piece had over 100 individual mortise and tenon joints, more than half of them were through-mortises. Lots of practice, and plenty of time to refine my technique.
There are certainly no shortage of methods to try.
Christian Becksvoort pre-drills the mortises with a doweling jig and cleans it up with a sash mortise chisel. I’ve not found that pre-drilling the holes saves any time – unless you have really wonky grain, in which case the chisel will tend to want to follow the grain if you don’t pre-drill. Best to use straight-grained stock instead.
Chris Schwarz no longer uses this method, but he once wrote about a method of drilling a hole in one end of the mortise and then chiseling back from that hole until you reach the opposite end (the “Maynard technique”).
Peter Follansbee uses a traditional mortise chisel and starts by cutting a vee in the middle of the mortise, then working his way back to the ends. I really want to like this method, and I’ve tried it several times, but I find that my accuracy is compromised by switching the bevel back and forth like he does. I like to get my chisel in the right position and keep it there.
Which is why my preferred method is something along the lines of what Paul Sellers does. Actually, “along the lines” is dead wrong; I chop my mortises exactly like Paul Sellers does. Oddly enough, I had never even seen him chop a mortise under I was gathering links about different methods for this very post. Our only difference of opinions: he prefers a standard bevel-edge, chisel, while I prefer the traditional mortise chisel.
So, on that note, a change of plans. I had taken a bunch of pictures that were intended to demonstrate the method I use, but instead I’ll just post Paul’s video instead. If a picture’s worth 1000 words, a video must be worth 10,000.
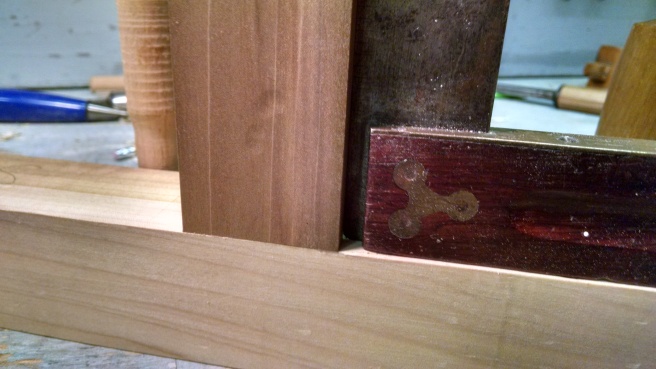
Okay, I can’t resist a bit of commentary on Paul Seller’s methods. In all of his videos where he’s mortising something, he’s holding the piece in his face vise. That sure seems like a good way to add unnecessary stress to your vise and the screws that are holding it in place. I mortise with my workpiece clamped to the benchtop, directly over a leg, using a holdfast or a big handscrew. Like so:

Also, I mark out only three sides of the mortise: the top, the bottom, and the edge that is closest to the face. The chisel itself defines the fourth side, so I don’t find it helpful to mark out the far edge. The only thing to watch out for with this method? Don’t chop your mortise on the wrong side of the line! Sometimes, when the mortise is close to the face (like in this example), it’s obvious which side to chop on. Other times, when the mortise is more centrally located, it’s not quite as clear. I have chopped on the wrong side of the line before, so I tend to draw a little squiggle on the side where I need to chop. (I don’t usually darken the scribe lines with a pencil, though- that was just for the picture.)

My tavern table had 10 regular mortises and four double mortises. The last four that I chopped measured 2″ long and 1-3/4″ deep. Out of curiosity, I timed myself and found that I chopped them in 4-5 minutes each. It’s quick and painless once you’re familiar with the process, and there’s nothing quite like sliding a joint together for the first time and having it look like this:

Sellers’ method is exactly what I do, and I think what Wearing suggests too in The Essential Woodworker.
LikeLike
I know I saw this method somewhere before years ago, but I can’t remember where. I haven’t read Wearing, but I’ve read a lot of Schwarz, who’s read a lot of Wearing, so this method was probably in Popular Woodworking at some point. I’ve tried just about every method out there, and I definitely think this one wins for speed and ease.
LikeLike
Yup, it provides a nice big place for the chips to escape into. You’re just shaving down the wall as you move along the mortise.
The one bit I disagree with: I much prefer a classic mortise chisel here. I feel like the wide walls help keep the chisel straight in the mortise as you walk down.
LikeLike
Are you saying you disagree with me, or with Paul Sellers? Because I definitely prefer the traditional mortising chisel as well, and mentioned that in the post. Sellers is clearly proficient with the bevel-edge chisel, but I think it requires more skill and practice than the traditional mortising chisel.
LikeLike
Yep, exact same method I use, too. I learned it from Sellers when I took a couple courses at the Heritage School in Texas. I could never get the hang of it using a bevel-edged chisel, though. The chisel would always want to twist on me, so I either drilled out the waste or did my best to avoid mortises and tenon construction altogether.
Then I got a real mortise chisel.
It’s just a cheap Narex, but oh, boy, did that change things! M&T has become one of my favorite joints. I do find that I can still save time by drilling out the waste on my drill press IF it’s a deep, blind mortise and I have more than a few to do. Shallower mortises and through-mortises are still just as quick with the mortise chisel.
LikeLike
I had the same experience as you. I started out chopping mortises with a bevel-edge chisel. Works fine, as long as the mortise isn’t too deep, but it’s a pain in a deeper mortise. I got some vintage pig-stickers and never looked back.
I’ve tried mortises every which way with a drill press, but ultimately determined that it didn’t speed things up at all. It takes me as long to pare the walls on a drilled mortise as it takes to chop the entire mortise by hand. I sold my drill press to my brother over a year ago, so it’s not even on the list of options any more.
LikeLike